Loss of Accuracy After Annealing

When Annealing

It is best to do it in a darkned room and strive for heating the necks to a straw color. Do not allow them to glow at all. I have found that brass I over annealed does come back after it is fired and worked two or three times. A friend who pased last year, who shot, tested and kept data bases on all of it said that newly annealed cases gave their best accuracy @ firing #2 and accuracy declined slightly with each firing after.

The condition of the surface inside necks is important for consistent neck tension. There is a petina present after the carbon has been burned off , which will give one a gitty feelin when seating. Shiny insides is best and I suspect tough to maintain but hard necks are not a good thing, from my experience.

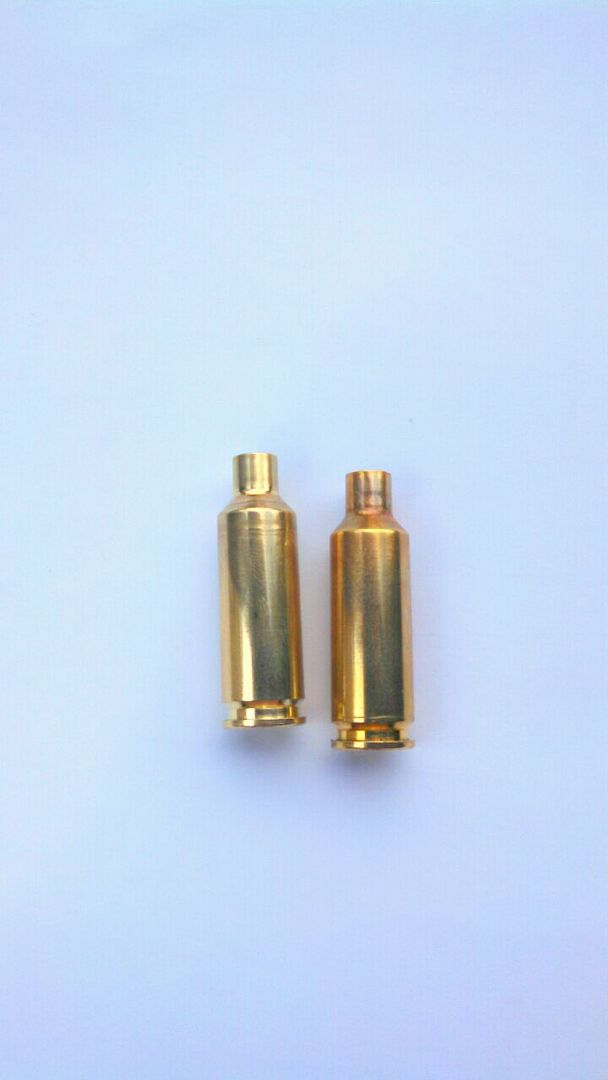
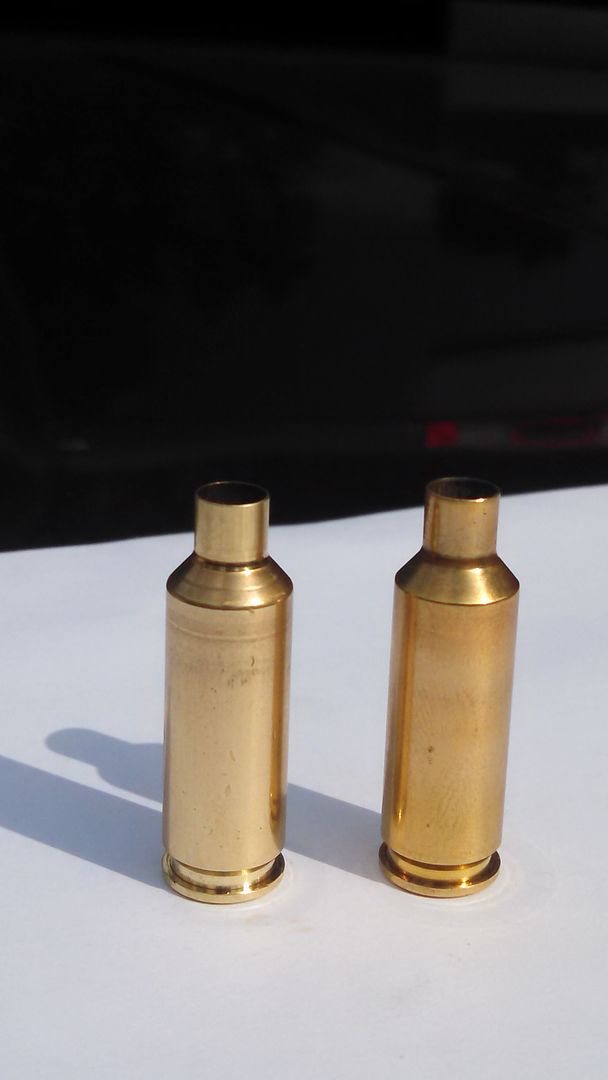
Properly annealed cases should show he same coloration as the necks new Lapua cases. If they don't turn to that color after a few days, either they are over or not annealed.

Pete
 
Last edited:
how offen to anneal

I have seen that some guys will anneal their brass after each firing in an attempt to keep the neck consistent. some not until they fire them 10-12 times.
both sound wrong to me. If you can't tell how hard the brass is before or after, then how can you tell if it's done right. of all of the thing that go into shooting, annealing is the only one I can think of that can't be measured. and in the game of .0002 +/- that just doesn't fit. I have and still do anneal all my brass but can't really tell you why.........


Bill
 
First the color…… on polished or really cleaned brass you don't see the same color as factory Lapua brass. You can test your brass after annealing to see if it's good. I do a lot of annealing and i use cases that have been fired a hundred times. When you shoot long range you need uniformity and and annealing is a way to uniform neck tension. Lapua brass does look good but i have found some that cracks at the shoulder fire forming to a Dasher, to eliminate this i anneal the new brass then fire form. So much for looking like Lapua's annealing…….. Jim O'Hara
 
I'm not into the pics and stuff, maybe i can get a guy to do it……. i'm old school,i guess……. jim
 
2 things I have learned over the years about annealing:

Polishing and/or working the brass changes the coloration.
A Lapua rep once told me that they do not polish their brass as it seems a waste of time and serves no purpose other than cosmetic appeal. Since there is not beautiful case competition that I know of, I took this information to heart and always annealed my brass in such a way as to match the Lapua neck/shoulder patterns and colors INSIDE and OUT.

This cannot be done on the cheap with a single propane torch. Water never touches my brass, never.


Ok I lied --3 things.... Reseting the ductility of the neck allows for more consistent neck tension and why anyone would think that neck tension has no effect on accuracy is beyond me.

For me, annealing after every 5 to 7 firings, depending upon the cartridge works well. I do not work my cases very hard as the resizing dies I use and chambers of my rifles are well matched.
 
Id like to see what a case looks like properly annealed in a bench source machine after corn cob polishing. I have seen em perfect according to the paint but colors are all over the place. Just wanna see whats right
 
I will post some pics tomorrow of annealed brass that's been run thru my tumbler before annealing.

Ok I uploaded a video link from my phone to you tube showing the bench source in action and if you look closely you'll see the color of the necks. I have one touch directed on the neck and the other down at the junction of the neck and shoulder. The temp on these are between 650-750 according to my templaq sticks


http://youtu.be/maejuhLYRaM
 
Last edited by a moderator:
If I had it to do over,

I would buy one of those Induction heaters made for mechanics and use it to anneal with. No flames, no muss , no fuss.

Pete
 
Here are a couple photos. One on left has not been annealed but polished, the one on right has been polished and annealed.

IMG_20140819_095653_zpsohdty1iq.jpg


IMG_20140819_094622_206_zpsbgsgrvjy.jpg
 
James, thanks for the pic……. that is what mine look like. If you want to see good annealing look at the old white box Lake City 308 ……… not Lapua……… jim
 
I think I may have failed to mention that my induction heater, while cooking the necks perfectly, is not a tool built for speed. These days I have lots of time and do not roast more than 100 cases at a time, so it works just fine for me. If I were still broiling 200 to 500 at a time I would never have given my KL machine to my son.
 
bill123,

I found this thread looking for some information on annealing. Though I know nothing about it I think you've made a good start. I'm with the people thinking the brass now needs a little work hardening to bring it back.

While running a CNC lathe the welder's at the shop used to silver braze copper tubing into some brass balls so I could use the tubing for directing coolant. They would get it very hot then they would run it under cold water. I sort of freaked out at first thinking that it would harden it. They told me that copper worked the opposite of steel. It actually left the tubing dead soft.

I don't know if you've ever tried bending tubing without a spring or something like a form to keep it from kinking. This tubing they told me I could bend it about two or three times before it would get work hardened and start kinking. Sure enough I could bend it around corners or whatever to get it aiming at my tools or drills pretty safely. Sometimes chips would push the tubing away because it was still soft. It only took a couple of times bending it back and the shape would set.

The first couple of times you bent the tubing you would feel nothing about the third time or so you would start feeling internal stress building up and it would feel like it was cracking inside. It wouldn't actually be cracking but the work hardening stresses would start to build and you could feel it.

I think that may be what the cases need. I've heard a case expands and seals and then springs smaller a little. That's why I'm with the firing it or maybe even expanding it and then resizing it a couple of times, but I wouldn't want you to undo all of your hard work. It sounds like with your testing you made a perfect start.
 
I remember my Lapua cases coming in showing a beautiful discoloration from annealing. In real life I remember it looking more pronounced than this picture.

aldjfald.jpg


I'm not sure if you are aware of the way we resize this .220 Russian case up to 6MM and turn the necks. I don't remember all the steps at the moment but I think by the time we've fire formed the case to 6PPC it is probably already getting due to be annealed.

P.S. And if I'm reading jim1K right;

James, thanks for the pic……. that is what mine look like. If you want to see good annealing look at the old white box Lake City 308 ……… not Lapua……… jim


I don't think he means don't look at Lapua brass annealing. I'm sure he looks at every sign of annealing he gets a chance to look at. I'm thinking that maybe he means is that in his experience he's found he can go short on the heat of what they show.

The Lapua cases to me are made by the masters at this sort of thing. Maybe the heat shown on their cases is from several die operations and maybe even several annealings. Maybe he's found once you got your fire-forming done and have just been bumping back some and resizing necks you can get the heat down on the short end of the scale.
 
Last edited by a moderator:
I just had another thought on this topic.

jim1K
mentioned to look at lake something .308.

My Google Foo failed me on the .308 part but it did turn up a pretty picture.

http://www.midwayusa.com/product/624386/lake-city-pull-down-reloading-brass-556x45mm-nato-primed-box-of-500-bulk-packaged

Notice the blue at the bottom of the heat mark on the case at the link?

I used to butt-weld wire together for undersea cable. The first part of the butt weld would take two wire ends and heat them up until spring pressure pressed them into each other. The next step was to anneal the weld. It would send an electric charge through the wire that would heat it up. While it was heating it was very important to watch for the color change coming together down the two ends of the wire. I can't remember the total sequence but the blue color seems to be important if I'm remembering right. I think the blue would come together and a little black bar would come in racing faster from the outside and when they met in the middle you let the button off. Then you'd file down the weld bump. If you did it right, when it was stretched for testing it would break somewhere other than the weld point.

I think I'm working myself up to be more partial to the induction method. Though I suppose a pan of water and a hand held torch will be the farthest I ever get in this exploration.

I hope you check back in bill123 and let us know how it's going.
 
I’m a prone shooter working on improving my 1000 yard precision. I just started annealing and processed my 3x fired 308 Lapua brass with a Bench Source annealer. All signs (tempilaq, flame color changing) were correct and the maker of the Bench Source assures me that I am doing the annealing properly.

At 100 yards, my un-annealed brass was giving me 3/8" groups. My annealed brass is now giving me 3/4" groups. I went back to the un-annealed brass and shot a few groups, just now to see if the 3/4" groups were me or the brass. I got 3/8" groups so I'm assuming the problem is the brass.

I neck turn my brass to .014”
My fired case necks are .340” diam.
Neck diam. of finished cartridge w/ bullet: .3355"
Bullets are .3075” measured diam.
I resize with bushing dies in 2 steps .336” then .332”.
My Sinclair mandrel measures 3.055” diam.
After expanding my cases, the neck diameter is .3335” (.002” neck tension)

The maker of the Bench Source unit recommended that I try different bushings to see if that brings the groups back down.

I loaded and shot 2 sets of brass. One with a .331” bushing and one with a .330” bushing. The precision with the .330” bushing was better but not great.

Has anyone experienced this before?
Should I continue to test with smaller bushings?
At what point and I over working the brass because I have used too small a bushing?
In other words, did the annealing make my brass so soft that I had to over size in order to get my rounds to shoot as well as they did before annealing?

One more thing, prior to annealing I was using an ultrasonic cleaner to clean the brass but I switched to SS tumbling at the same time that I started annealing. I know, I should have made one change at a time.

Sounds like the remedy is to cease annealing, and shoot un-annealed brass. :)
 
One more thing, prior to annealing I was using an ultrasonic cleaner to clean the brass but I switched to SS tumbling at the same time that I started annealing. I know, I should have made one change at a time.


Good one! :) Wouldn't life be so simple.
 
Back
Top