Hi,
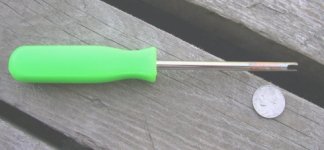
Here are instructions that I got and have used and a photo of the tool used to compress that firing pin spring. I got the tool about four years ago from some guy through Ebay and I don't remember you he is.
I hope this helps.
Jim
WINCHESTER 52 BOLT TOOL INSTRUCTIONS
WARNING! MAKE SURE FIREARM IS UNLOADED!
BOLT DISASSEMBLY PROCEDURE:
STEP 1) REMOVE BOLT FROM FIREARM.
STEP 2) PLACE BOLT IN A PADDED VICE. CLAMP BOLT FIRMLY TAKE CARE NOT TO OVER TIGHTEN THE VISE AGAINST THE BOLT. (NOTE: CLAMP BOLT IN THE FORWARD SECTION OF THE BOLT BODY, THIS WILL LEAVE THE REAR OF THE BOLT ACCESSIBLE FOR EASY REMOVAL OF THE FIRING PIN/SPRING RETAINING PIN.)
STEP 3) REMOVE THE THREADED CAP FROM THE FIRING PIN, AT THE REAR OF THE
BOLT.
STEP 4) PULL THE BOLT HANDLE REARWARD, THIS WILL EXPOSE THE FIRING
PIN/SPRING RETAINING PIN.
STEP 5) INSERT A 3/8ths FLAT SQUARE OBJECT BETWEEN THE BOLT HANDLE SLEEVE AND THE BOLT BODY (NOTE: PLACE IN A LOCATION NOT TO INTERFERE WITH RETAINING PIN REMOVAL.) NOW GENTLY RELEASE THE BOLT HANDLE UNTIL IT COMES TO REST ON THE 3/8ths OBJECT. (NOTE: THIS WILL FREE BOTH YOUR HANDS TO CONTINUE BOLT DISASSEMBLY.)
STEP 6) USING A PUNCH START TO DRIVE THE FIRING PIN/SPRING RETAINING PIN OUT FROM THE BOLT BODY.
STEP 7) INSERT THE 52 BOLT TOOL INTO THE REAR OF THE FIRING PIN, MOVE THE
TOOL AND ITS SLOTTED END FORWARD UNTIL CONTACT WITH THE FIRING PIN IS MADE. (NOTE: TOOL MUST BE TURNED CORRECTLY IN ORDER FOR ITS SLOTTED TIP TO PASS BY THE FIRING PIN/SPRING RETAINING PIN. THIS WILL ALLOW THE TOOL TO REACH THE SPRING.)
STEP 8) PRESS FORWARD ON THE FIRING PIN SPRING WITH YOUR 52 BOLT TOOL, WHILE SPRING IS SLIGHTLY COMPRESSED USING YOUR PUNCH PUSH OR GENTLY TAP OUT THE RETAINING PIN.
STEP 9) NOW THAT THE RETAINING PIN HAS BEEN REMOVED, GENTLY WITHDRAW YOUR 52 BOLT TOOL. FIRING PIN AND SPRING CAN NOW BE REMOVED. (NOTE: REMEMBER THE WAY YOUR FIRING PIN WAS TURNED UPON REMOVAL, THIS WILL SIMPLIFY REASSEMBLY.)
BOLT RE-ASSEMBLY PROCEDURE:
STEP 1) RE-INSERT FIRING PIN AND SPRING INTO BOLT BODY. (NOTE: MAKE SURE
SLOT IN FIRING PIN IS IN CORRECT POSITION TO ALLOW RETAINING PIN TO PASS
THROUGH FIRING PIN.)
STEP 2) INSERT 52 BOLT TOOL, INTO REAR OF FIRING PIN. (NOTE: INSERT 52 BOLT
TOOL IN SUCH A WAY THAT YOUR FIRING PIN/SPRING RETAINING PIN CAN PASS
THROUGH THE SLOTTED TIP.)
STEP 3) USE A PUNCH TO START YOUR RETAINING PIN INTO THE BOLT BODY.
STEP 4) USING YOUR 52 BOLT TOOL, COMPRESS THE FIRING PIN SPRING AND DRIVE THE FIRING PIN/SPRING RETAINING PIN THRU THE SLOT IN FIRING PIN, THEN THRU THE SLOTTED TIP IN THE TOOL AND STOP WHEN PIN IS FLUSH IN THE BOLT BODY ON BOTH SIDES. (NOTE: RETAINING PIN MUST BE FLUSH ON BOTH SIDES OF THE BOLT BODY TO ENSURE SMOOTH ROTATION OF THE BOLT HANDLE AFTER COMPLETING RE-ASSEMBLY.