My apologies Ron! I just read your post today
Check out my facebook "sebastian lambang" for the quick detach lever & update.
https://www.facebook.com/photo.php?fbid=830338840326871&set=pcb.830343666993055&type=1
https://www.facebook.com/photo.php?fbid=671089419623947&set=pcb.671089456290610&type=1
https://www.facebook.com/photo.php?fbid=671089399623949&set=pcb.671089456290610&type=1
https://www.facebook.com/photo.php?...7513.361020.586722512&type=1&relevant_count=1
JOY-POD MANUAL SHEET:
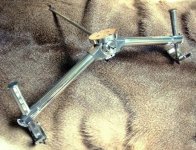
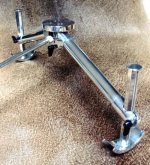
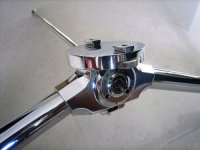
The new-improved (gen-3) JOY-pod is the most advance & innovative F-Class bipod available today. Designed primarily for F-TR match, however it can also be used for other purposes such as varmint or tactical shooting, sighting-in or load developments, and even for F-Open if your F/O gun weighs no more than 20.8 lbs.
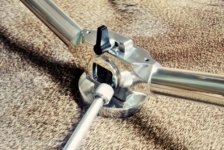
JOY-pod (TM) features a joy-stick controlled mechanism that allow you to adjust the point of aim rapidly in one motion - either horizontally, vertically or diagonally.
It's the first & only one in the world! (Patent Pending).
The JOY-pod is also a joy to shoot, it tracks straight, no rear bag squeezing is needed, no soar fingers, no change of body position etc during the shooting string. That was why we called our new bipod: the "JOY-pod".
FEATURES :
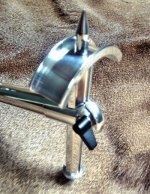
- Rapid set-up & Quick Attach/Detach
- Equipped with Cant adjustment (12 degrees total) for uneven ground
- Equipped with built-in uplift, will hold F-TR & F-Open gun
- Weighs only 18.7 ounces (530 grams) including the joystick & the picatinny piece/adapter
- Weighs 18.1 oz without the adapter (i.e. if directly attached to a stock w/ integral picatinny rail).
- Has universal T-slot, which will fit either Anschutz or Freeland rail
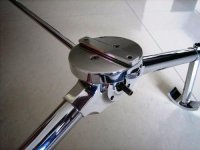
- Very stable & rigid, the bipod can accept 150 lbs+ weight on the top without much flex on the structure
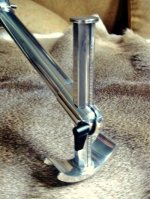
- Height adjustable (coarse elevation) from 5.2 inches to 10 inches
- Independent legs with innovative "ratchet" system & quick lever lock on each side
- Has approximately 20 MOA vertical travel & 25 MOA horizontal travel in the joystick
- Reversible joystick, it can be used either "up for up" or "up for down"
- Extra long, larger & more rigid joystick for finer adjustment & more effortless joystick operation, also larger & secure thumb-nut.
- Bent/angled joystick to allow your hand to operate the joystick steadily on the ground (not hanging "in the air"), at any height
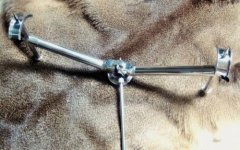
- Extra wide footprint (20.5 inches from feet to feet), and maintain the same footprint at any height
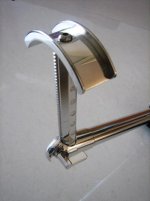
- Extra large-smooth & tilt-able (can be angled) "ski-type" feet
- Has no any rattles in the bipod, no sharp edges, burrs etc. All parts are high polished & tight fit
- Any parts will not loose etc under repeated recoil
- Suitable for thirty caliber or even larger
The JOY-pod comes with a soft carrying case & two allen hex wrenches (2.5 mm & 3mm) & 8mm hex open wrench. Also an Exploded Drawing with Parts List.
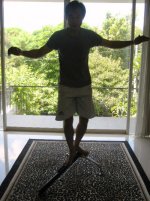
It is recommended to use the JOY-pod with a "Pod-Pad" under the bipod.
Pod-pad (TM) is a new, thick & heavy bipod mat designed to work on most grounds/surfaces. It's robust and weather-proof, can be folded or rolled-up. *(Pod-pad is not a "board" regarding to the rules). This mat is equipped with carrying handle on each side for easiness to haul. Features slick & durable top surface to allow the bipod to slide/track freely & smoothly. It has four partitions, will be sand filled, with a sand fill hole on each partition. *Any sands will work. With heavy sand it will weigh about 11 lbs.
The "Pod-pad" is optional item.
PREPARATION :
1. First remove the picatinny piece/adapter on the top, twist/open the lever lock
2. The adapter piece will be first attached into your Anschutz or Freeland rail
3. Loosen the screws that hold the "T"-slots for about 2-4 rotations. Use the small (2.5mm) allen hex wrench provided. The T-slots work either for Anschutz or Freeland rail, rotate the T-slots 90 degree and find which side that fits into your rail
4. Insert the adapter into your rail, set it to your desired placement, then tighten the screws
Ignore #2,3,4 if your stock has picatinny or weaver rail already. The top will be directly attached into your own picatinny/weaver rail.
In case your stock does not have a rail, remove the T-slots & serew directly the adapter piece to your stock/fore-arm at your desired placement.
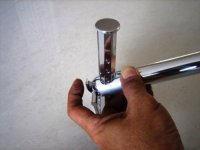
5. Attach the QD top into the adapter piece (or into your own picatinny rail), then tighten/lock the lever
You might probably need to tighten or loosen the "nylock" hex-nut by a bit (use the 8mm hex open wrench provided) and adjust it to your desired tightness.
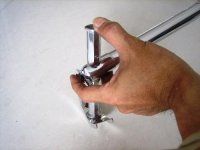
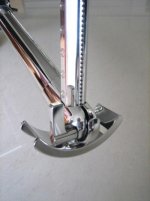
6. Attach the joystick into the center shaft then tighten the thumb-head counter clockwise (left hand rotation from your side)
That's it all.
Next, Experience The New Concept! Lay down, operate the joystick & find the advantages!
HOW TO SET, OPERATE, & REMOVE THE JOYSTICK :
Loosen the thumb nut, insert the head of the joysick into the center shaft, then tighten the thumb nut counter-clockwise (left hand turn) from your side.
Twist the joystick so that your hand will lay steadily on the ground or bench top, not hanging in the air. It's much easier to fine-adjust or moving the joystick when your hand sits steadily on the ground/bench top.
Turn the thumb-nut clockwise (right hand turn) to remove the joystick.
Be sure the center shaft and the inner side the joystick head are clean, no oil etc.
You may cut the length of the joystick, but it is recommended to use a longer (current length, "as is") handle for finer & more effortless joystick operation. Also that new F-Class stocks tend to be longer these days - the long handle will be more comfortable to use.
In case you want to cut the joystick: first remove the end cap (it's a tight fit) - cut the joystick to your desired length. Use a mini pipe cutter or simply by hack saw & debur.
It is recommended to glue the end cap once you are satisfied with the length of the joystick.
HOW TO USE THE BIPOD IN "UP FOR DOWN MODE" :
The JOY-pod is shipped in "up for up mode" (moving the joystick up will move the reticle up, moving the joystick to the left will move the reticle to the left, etc)
To use the bipod in "up for down mode" you will need to inter-change the vertical legs & the lever locks - to face rearward (shooter's side). In this configuration, the tension screws & the "JOY-POD" logo will be facing rearward.
HOW TO ADJUST THE CANT :
1. Loosen the lever lock in the center / under the "coaxial unit"
2. Twist your rifle to the desired direction
3. Be sure the rifle is 100% vertical or plumbed, then lock.
The lever lock will hold the angle securely, even under hard recoils.
HOW TO ADJUST THE FEET ANGLE :
The feet is designed with longer part in the front and can be angled (tilt-able) to make full contact with the mat.
First loosen the countersink screw on the bottom - adjust the set screw in/out - then re-tighten both screws.
Be sure the feet are parallel.
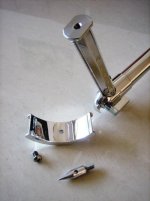
HOW TO REVERSE THE QUICK DETACH TOP :
The quick detach top can be reversed, with the lever on the left or right hand side, also tightening forward or rearward.
First loosen the two countersink screws on the top.
You'll find that the built-in uplift (two coil springs inside) will give a strong upward pressure.
Reverse the picatinny piece on the top to your desired direction.
If you want to reverse the lever screw only (to tighten rearward), just loosen the lever, twist it 180 degrees & adjust the tightness of nylock nut.
In case you have difficulty to re-install the top, ask someone else to help to hold the top while you are screwing the screws.
However it is recommended to use the top piece/configuration "as is".
Do not change the QD top setting if you don't have mechanical skill!
HOW TO REVERSE THE LEVER LOCK :
It is better to have the lever lock facing shooter side as it is closer to reach
1. Loosen/remove the "nylock" hex-nut & washer, use the 8mm wrench provided
2. Pull the lever-screw out. Be sure to keep the "rachet" piece & small coil spring in place
3. Insert the lever-screw from the other/opposite side, install the nut, then tighten
4. Adjust the tightness of the nylock-nut so that the lever will lock securely but not too hard to lock.
Do not over tighten the nut!
HOW TO INTER-CHANGE THE LEG :
1. Pull-off the top end cap of the leg
2. Remove/slide it down the leg
3. Put/interchange the one to the other side, slide it up through the hole on the end of the bipod's arm
4. Re-attach the end cap.
HOW TO ADJUST THE HEIGHT / COARSE ELEVATION:
First loosen the lever lock --- push the "rachet" piece with your point finger --- put your thumb finger on the top of the leg, another one or two fingers under the end joint of the arm, then raise up or down.
Lock the lever once you are satisfied with the height setting.
HOW TO ADJUST THE TENSION SETTING :
The new internals are precision made and already tuned when you receive it.
The function of the tension screw is to add more tension/pressure on the internals.
If you want to change the tension setting, there are two tiny set screws (M5x0.7 thread) in the front, on both side of the center shaft. Turn clockwise to tighten, turn counterclockwise to loosen the tension.
HOW TO ADJUST THE ROTATIONAL RESISTANCE OF THE CENTER SHAFT / JOYSTICK :
The center shaft is secured into the "front" bearing (the one on the outside).
The tighter the bearing the more the rotational resistance of the center shaft will be.
There is a jam/set screw under the "front" bearing (at 6 o'clock), use the 2.5mm allen wrench to tighten.
HOW IF I HAVE PROBLEM WITH THE BIPOD? :
The JOY-pod has no 'chronic' problem and will last for years under normal use.
However just in case you have problem with your Joy-pod, contact your dealer or the maker directly.
CAUTIONS:
1. Do not harm the center shaft, it will damage the bearings and create slob/play in the joystick
2. Do not remove the internals. Remember the wise words: If it's not broke, don't fix it!
3. Keep the joystick removed when not in use.
4. Do not over-tighten all the screws.
5. Keep the bipod clean & dry after use.
Please do not hesitate to contact me if you have any questions or problem with your JOY-pod. I always have time for our customers.
Best Wishes,
Sebastian (seb) in Indonesia.
sebastianlambang@yahoo.com
mobile +62 081 134 5100.
In addition:
Just like our NEO & MAX rests - our JOY-pod bipod is covered with 30 days Money Back Guarantee and one full year warranty against any defect from the date you received the unit.
Within the thirty days, if you do not like the bipod for any reason, you can return the bipod for full refund. However it must be shipped back in "like new" condition (with no any damage) + the original packaging.
We are confident to say that our gen-3 bipod will last for years under normal use.
We will also adopt the new bipod internal design to the next coming NEO & MAX rests!
seb.