Skim Bedding for dummies?

G

GJgo

Guest
I've received the advice in another thread that I could benefit from skim bedding the action on my Sako 75 6PPC. I really love this rifle, and while I'm very mechanically inclined I've never done this before and want to make sure not to booger it up! So, can anyone post a step-by-step on how to properly complete the job? I've gleaned some ideas by reading other threads & searching the net, but haven't found a good "tutorial". Thanks in advance!
 
2nd step, use lots of masking tape and modeling clay to keep the goo out of and off of areas you don't want boogered....... and using toothpicks and small square-ended craft sticks clean off all the oozes before the stuff gets hard. Mask the sides of the barreled action and the top of the stock and leave a hairline gap for the gunk to ooze out. Block the barrel channel with a 'snake' of modeling clay for a smooth line.

I use Kiwi 'neutral' shoe polish for release agent.

Bed at room temperature not out in your 50 degree shop or garage. Or leave a lamp on it overnite.

Make sure you leave clearances for when you pop it out.... don't let the epoxy extend over nor around anything which impedes lifting out...... put a layer of masking tape on front and sides of the recoil lug, leave the back (bearing surface) clean.

When it come time to pop her out (next day) you remove all screws or unwrap the surgical tubing and holding the pistol grip and forend gently 'pop' the barrel down on a padded surface.... like a doubled towel on a solid table top. now work it up and out. If you use the action screws don't crank them down or you'll just warp the action to match the (crooked) bedding block.

IF IT GETS STUCK.... post here for advice. DON'T PANIC! :)

As for tutorials.... there are some on the net. I'll try to find one if someone else doesn't beat me to it.

al
 
using toothpicks and small square-ended craft sticks clean off all the oozes before the stuff gets hard.
You're overcapitalising there. Al.

I use the nearest cardboard package lying around that's stiff enough & cut it into the necessary shape with scissors. If you bend a piece into a sort of L shape & hold it against the job, you can scoop a whole lot of epoxy off without drips for a first run, then come thru with a clean sharp shaped edge for the final cleanup.
 
I always begin by making a saddle just back of the forearm tip. Wax the barrel
well there. This is to center the barrel in the channel and establish the height.
Being forward of the balance point, gravity will allow the action to sit on its
own accord, neither stressed or distorted. It comes out when the bedding is done. Some actions just sit in the stock a bit higher or lower than they
should and now is the time to change that. Wax everything including the stock. don't forget the screws. Hand screws or stock screws must be used
to align the action with the holes so you don't bed the action in a rotated
position. Good bedding is not a quantity thing, but a quality thing. Coating
the entire inside of the stock with epoxy is not a good thing if it traps air.
That causes air pockets or voids. You must evaluate where to put more
or less epoxy. Some recoil lugs are cut deeper and need more fill. If you are
bedding the area forward of the lug, that may require more. Trace around
the tang with a small pointed tool and do not relieve the wood beyond that
point. Cosmetics won't change the performance, but when finished
you should not be able to tell that it was bedded. After putting the barreled
action in the stock with bedding , don't edge away all the epoxy immediately.
It will pull back in about 20 mins later as some of its heat has dropped.
tightening the screws to pull it down is ok, but back them up a 1/4
turn so you have imposed no stress. The most important thing is go
through the process in every step in your mind and as a dry run. A full
24 hrs @ 70 degrees allows a full cure. You will have epoxy on your
mixing board, test it for strength. The thin stuff cures a bit slower.
 
To help avoid air bubbles, put a thin coat of epoxy on the action in addition to the stock. This was standard practice on M14NM rifles.
 
To help avoid air bubbles, put a thin coat of epoxy on the action in addition to the stock. This was standard practice on M14NM rifles.

MilGunsmith

Have you done this on bolt action rifles? I can't see anything but problems here... maybe I'm not seeing the process? First of all how do you apply the stuff on the action? Are you saying to smear a thin coat or what?

My method is the exact opposite. I put a heavy slug down the center of the action cutout so that as I gently set it in it pushes a bow wave and doesn't trap air.

I've been happy with my latest way but always learning....

al
 
I have done several of my own and now use the 4 step method posted below.
Step 1
Get a large cardboard box and foam it so it won't collapse.
Step 2
Put the barreled action trigger and stock inside making sure they won't rub and seal the box with a complete roll of strapping tape.
Step 3 Mail it to Alex Sitman at Masterclass Stocks
Step 4 Remove it from the box and tell all your freinds you did it yourself.
Waterboy;)
 
HERE ARE A FEW LINKS
http://www.charm.net/~kmarsh/bed.html

http://www.ranchtrippin.com/bedding/

http://www.rdprecision.net/diy2.html

Well had a go my self a few years ago,i couldn't find marine tex so i used jb weld.
15632PIC_0038.JPG

As you can see done in the kitchen
15632PIC_0058.JPG

Mask the stock and fill every hole,epoxy resin want to go there.(kid's play clay is good)
I also lightly dremmeled the alloy area's on the stock,as a key for the resin.
15632PIC_0059.JPG

Carefully put masking tape on the lug,do a good job .Cover each surface,and trim with a sharp knife.
15632PIC_0065.JPG

Cover the barrel and lug in a release agent,i used kiwi neutral boot polish.I put a couple coat of this on most of the barrel and action,i rubbed it in well but did not polish it.I also pull a coating of bees wax on the action screw's.Jb weld is easy to mix,i just emptied both tube's and mixed it.No measuring etc.

I used an old tea spoon and put the resin on the area's i wanted to bed,but i think i put a bit too much there.
15632PIC_0066.JPG

DON'T PANIC put the action back in the rifle ,don't forget the floor plate.
Lightly tighten the screw's and watch the resin ouse out.Clean up the excess jb weld,you can use vinegar but i was a bit nervous about using it(it an acid and i didn't want a rusty gun).Gale McMillan recommends kerosene in his clean up method.I didn't have any kerosene, petrol lighter fuel did the same thing.So got some old rag's and cleaned up with lighter fuel,be careful no smoking etc..8 hours later i slackened the action screws,and to my great joy the action popped out ok.
15632PIC_0070.JPG

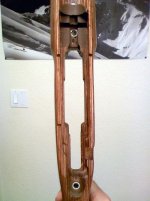
I was quite pleased with my first attempt :D of bedding.
I just read all the links above,but the down side is you could glue that action in just be careful :!:
P.S
The second time i did it was a lot easer.
_________________
 
The total no panic epoxy clincher.

If you do bugger up and glue the parts together..... here's a no-panic tip.

Epoxy can't stand heat. As far as I know, all epoxies melt at fairly low temperatures. The first maybe 20 bedding jobs I did I had several which scared me. My normal thing was, get it all done then stand back and worry... "did I remember to grease the screws?" Is the mag box fully released?" "What if epoxy got into a screw hole? Or up into the trigger recess?"


worry worry worry.....

Epoxy has gained a reputation as The Forever Glue, tough and indestructible. GOOD until you permanently affix two unwanted parts!

So here's the thing. In the end, BEFORE you sacrifice either metal or stock on a rifle, but after freezing and knocking etc have you convinced you've got a problem.... heat will always break the bond. Not enough heat to wreck the metal finish nor even harm the stock as long as you're careful. Apply heat to the metal... exert pressure to pre-load the affected joint and slowly heat until she pops. And she WILL pop!

The epoxy joint will have to be ground out and redone but this is a small price to save a stock.

I've never truly stuck a bedding job. But I've come to count on the heat technique as a way of affixing parts firmly but temporarily.

al
 
I smear a thin coat on the action, even bolt actions, after coating with release agent and filling any holes with modeling clay. In doing hundreds of rifles, both bolt and M1NM/M14NM, over the past 30 years I have not had any problems with this method. I also use masking tape to form dams and electrical tape for clearances. I have used Acra-Glas, Steel-Bed, Devcon, Bisonite, and Marine-Tex, all with similar results. The most inportant thing is thickness of the material, some need a thickining additive to reach the proper consistancy to keep it from running. On the M40A1 sniper rifles we usally bed, then go back and skim bed after the first bedding has fully cured to allow for shrinkage.
 
I ran out of patience with modelling clay to fill large stock voids some time ago. It's a POS to remove clean & neatly, so these days I only use it to fill holes etc in the action where it can be picked out easily.

I fill trigger & magazine coutouts with rigid packing foam cut somewhat oversize for the hole it is to fill & set it in just proud of the stock so it almost touces the action. That way, I can edge around the void of the bedded stock either with a box knife or the Dremel, then push out hook the foam out clean & easy.
 
Well, I finally did it! After reading all the tips & links it really wasn't that bad. I picked up Miles Gilbert's Bedrock kit so I'd have all the stuff. I decided to do my hunting rifle first- to be honest, it probably needed it more. It's a Vanguard Sub-MOA with that improved stock on it- comes with aluminum blocks bedded in the stock. The front mount was actually pretty sloppy when the bolt was cracked loose. Now it's solid as a rock! The recoil lug is wedge-shaped in the front on that action so it popped out super easy.

Once I had that one all finished I got into my Sako 75 stock. I have to say, that stock was cut darn near a mirror of the action- very tight even with the action screws out. At any rate, I started with the inletting. The wood was actually pretty soft, so I decided to do it right the first time and add some aluminum pillars to it. The clearance in the front between the lug and the screw was real tight, so I made some custom pillars out of bulk tube I had at work- I'm happy with how it turned out. In addition, I found a "hump" running down the middle of the barrel channel in the stock that I removed. This rifle changes POI after 3-4 rounds down the tube (temperature related, not fouling) so I'm looking for any little thing to help it out- assuming it doesn't turn out to be just barrel stress.

I know exactly how well it shoots as-it-were, so I'm looking forward to a range session to test the results! Here's a pic I snapped of the finished product.
 

Attachments

  • 1216092202.jpg
    1216092202.jpg
    44.7 KB · Views: 339
Back
Top