Simple floating reamer pusher

E

eww1350

Guest
Here a some photos of a simple reamer pusher I use to ensure my reamer can align itself with the bore....I use an open end wrench held in my hand to keep the reamer from rotating during the reaming process...and feed small .025" then remove and clean reamer...the 1/4 x 28 hex bolt has the head machined square and polished...the shank with the ball end is also polished to allow smooth movement as the reamer is being pushed...

http://i300.photobucket.com/albums/nn1/eww1350/P1010180.jpg
http://i300.photobucket.com/albums/nn1/eww1350/P1010181.jpg
 
Last edited by a moderator:
It is not that simple. It would seem that a reamer would follow the bore.
But being unsupported laterally at the shank end, things get not so good
when we add the wrench to keep it from turning. The counteracting force
comes in at 90 degrees and allows the reamer to lean. This makes a fatter chamber. It is the Margins on one side that do all the cutting. Nearly all
floating reamer holders do this to some degree.
 
what the center hight of your tail stock?

hi
see floating hold are out this week ! i use but i would not use that one !!
as bob said the wrech is a bad i dear !!

but floating is better than just puting the reamer in tailstock with a drill chuck
as tail could be higher ( they should be by theway ) or lower that the head stock center
 
Last edited by a moderator:
Butch LAMBERT

Its the wrench that causes the problem. Given a dead center the reamer
is h eld in line to whatever degree the tailstock is aligned. Without it
the wrench causes the reamer to pull at 90 degrees to the wrench support.
To some degree, when the chamber has some depth the flutes will try to guide it but it will still pull
 
alinments

new machine have tail stocks set centre set higher the head stock center! the only way to get center ssame as head stock is the scrape or grid the base , but then in a few month it will be low !

i would just use a jacubs jt33 arbor to siut your tail stock as a pusher and make a big ring with a knurl on it to stop the reamer spining, if you make it long enough then you can put a flat plug in the back for your ball to rest on
 
It took over a week to get my lathe true. I got very lucky with the
headstock, but the tailstock was out in 3 planes. It was dowelled
and bolted. Adjustable tail stock center as someone mentioned here
would have been nice, but I've never seen one, bench centers yup
 
Here's a floating pusher I made and use. My chambers are dead nuts and the reamer is tight in the chamber when completed (chamber not over sized)

I'm not real crazy about the ball but I think the Bald Eagle has a simular approach and works great.
 

Attachments

  • SSC_0167.jpg
    SSC_0167.jpg
    23.2 KB · Views: 2,460
  • SSC_0165.jpg
    SSC_0165.jpg
    17.5 KB · Views: 1,738
  • SSC_0168.jpg
    SSC_0168.jpg
    22 KB · Views: 2,201
Last edited:
Its the wrench that causes the problem. Given a dead center the reamer
is h eld in line to whatever degree the tailstock is aligned. Without it
the wrench causes the reamer to pull at 90 degrees to the wrench support.
To some degree, when the chamber has some depth the flutes will try to guide it but it will still pull

That depends on how the wrench is held. If one just holds the wrench or allows it to react against the compound, you are correct and there will be side force.

However, if one holds the wrench with fingers curled around it and puts a thumb on it at the reamer shank, the thumb pressure will be almost exactly equal to and opposite to the side thrust of the fingers on the handle applying what ammounts to a pure couple countering the torque of the reamer. In this situation, with the pure couple, the side thrust is eliminated.

It's very similar to what one does when using a wrench and trying to avoid bending or putting side thrust on what is being tightened.

Fitch
 
Hand tapped holes will never be the equal of machine tapped holes.
A very skilled craftsman can minimize the issues, but they can't be eliminated. Side forces are the issues. Both reamers and taps are broken
from lack of lateral support. Broken flutes cause gouges in chambers.
Pre taper boring will give support to the reamer . if the taper is well matched.
Using a carbide roughing reamer in a well aligned lathe saves lots of wear
on the finish reamer. and makes the right taper. Years ago, I wound up
with 140 stiches in my left hand caused by holding tooling with a wrench.
Not again.
 
I just wanted to point out that with some care it's posible to hold a reamer, using a holder that has a single side handle, in a way that minimizes or almost totally eliminates the side force. Lots of folks use single handle reamer holders. One of the better selling ones, the Bald Eagle, is a single side handle.

As Butch correctlly points out, side force is the enemy. It seemed like useful information to those with such a holder to know it was possible to hold it so it would restrain reamer rotation with out exerting side force.

My comment is technically correct and is based on the properties of a "force couple" which is explained in any beginning statics book one might pick up, in college physics books, and probably most or even all highschool physics books (I don't have a HS physics book in my book case, I have the other two). It's also explained here:

http://www.engin.brown.edu/courses/en3/notes/Statics/Forcecouple/Forcecouple.htm

Bottom line, the effect of a couple is to exert a torque with out translation. In other words one can restrain a reamer from rotating using a single side handle with out exerting a side force on it if it is held in such a way that a couple is applied. That is easily done, and in fact it is probably the most natural way to grab the handle (at least for me), especially when trying to get a good start with the reamer.

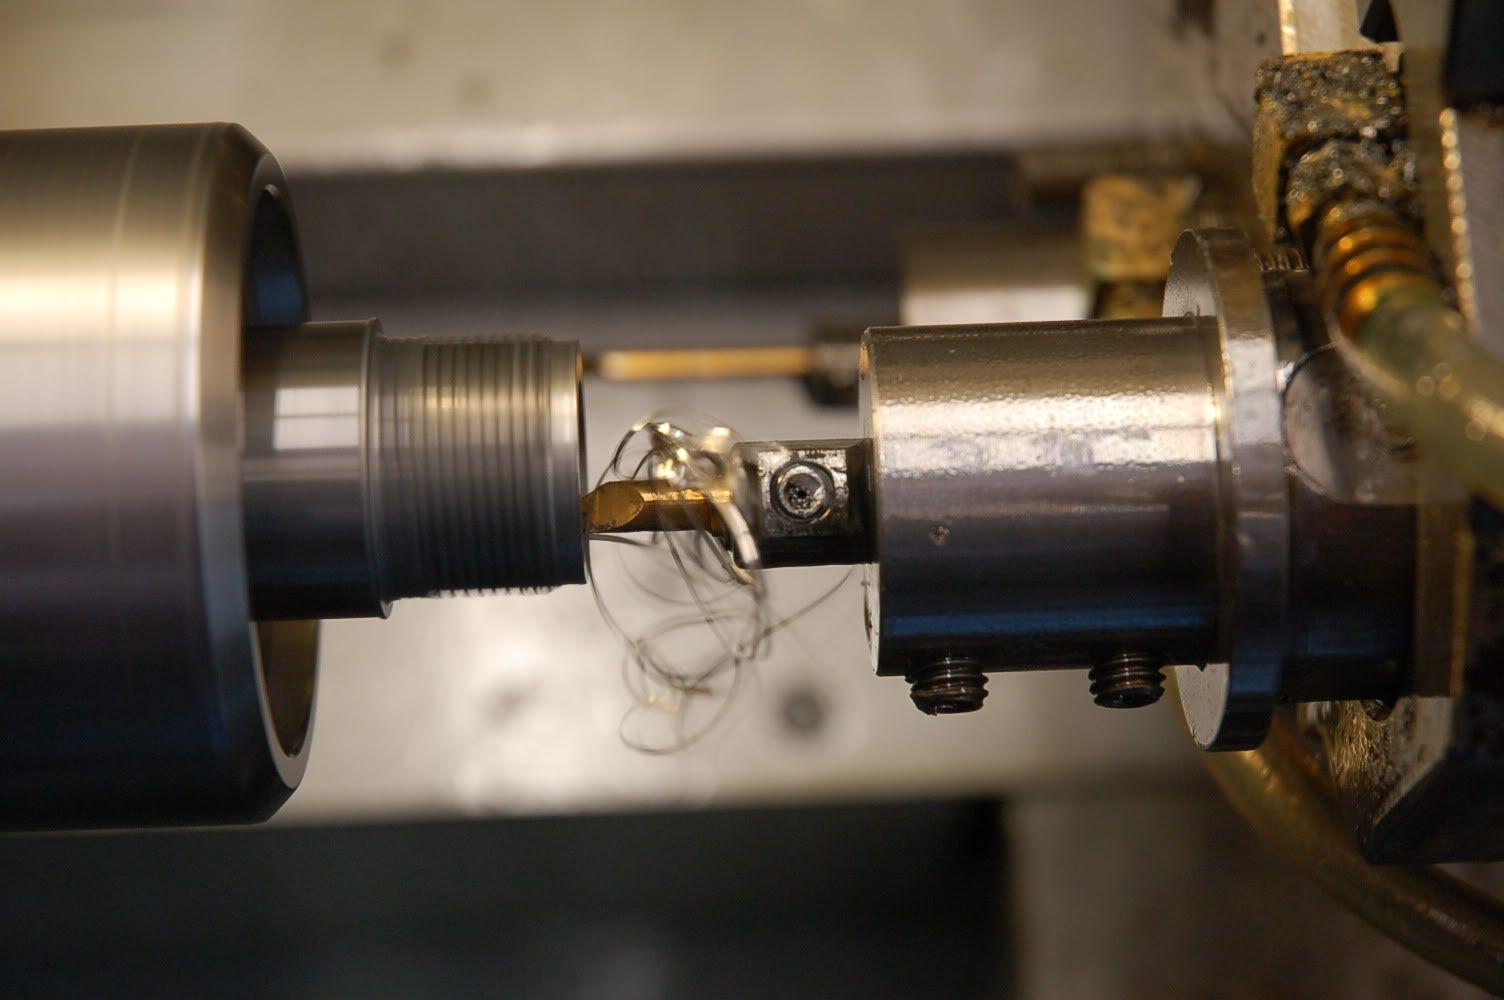
I don't think a wrench, or the pusher design that started this thread, is a good design for several of reasons (although it operates on the same principle as the well known Bald Eagle Pusher). I used something similar when I cut my first chamber except I had the ball on the reamer and pushed with a flat face, I held it with a cut off wrench using my thumb to eliminate side force, the rifle shoots better than I can - I was lucky. Nothing bad happened but I didn't want to do it that way ever again.

A wrench can come off way too easily and who knows where it will go if something sticks and it has to be let go of (if the ever viligant Murphy has his way it will go the worst possible place at the worst possible time).

FWIW: I copied the home made one I use now from another member's web page:

ReamerPusher-2RS.jpg


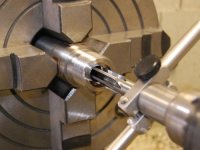
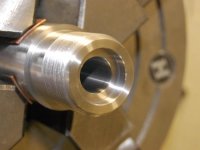
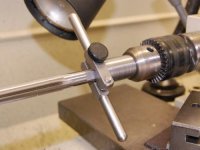
The front surface of the piece in the tail stock pushes on the flat face of the collar the handle is screwed into. The reamer end fits into the hole with about .020" radial clearance. When I'm holding it my thumb presses right on the dimple where the set screw is. It's dirt simple to make out of pieces in the metal archive that most shops have. The geometry tends to self align the reamer along the axis of the bore. It won't slip and the handle is only about 3" long so it can spin freely if it has to. It works really well in a manual lathe. I wouldn't try it in Chad's setup! It isn't the only way, or even maybe the best way, but it works, and it is easy to make.

Not everybody who uses a single handle reamer pusher holds it to minimize side force. In his video, Ed Franklin, who uses a Bald Eagle reamer holder, slips the handle into a larger diameter piece of rod and rests that on his fingers on the compound. That pretty much insures the reamer sees all the side force that is possible yet he still had hundreds of satisfied customers. That said, I wouldn't do it his way either.

Everything is a trade off if one looks at it in detail. In the big picture there doesn't seem to be any one way to do this successfully, but given a specific tool, like a single handle reamer pusher, there may be a best way to use it.

Fitch
 
I dont know if anybody has tried this, but how about, subtituting the pusher, just like in the picture from frwillia, to a ring magnet?, mounted in the tailstock.......that way you still have the simplicity of a pusher,but now the magnet can hold your reamer handle for you, while you concentrate on preventing it from rotating, also its not restrained so if the reamer wanted to move to follow the bore, it can do,.... may also keep the reamer inline whilst withdrawing it from the barrel...........just a thought..

KB
 
There have been several discussions

about reamer sizing of late ( like the past 6 months ) and the trend seems to be toward cutting a LARGE chamber in the rear. If this be so, having the reamer wallow a little bit should help ya instead of hurtin ya I would think. :)
 
Here's mine.

Regarding tail stocks, different heights, being off axis, etc.

There's a simple solution for this.

Use the carriage to feed the tool.

DSC_0033-2.jpg
 
As I recall

Jackie uses a three jaw for chambering. Apparently the chuck is adjustsble in several directions ?
 
CNC Lathes make millions of parts everyday with tolerances as tight as the finest chambers and often tighter, almost always using a three jaw chuck or collet holder.

I would suggest that if the outside of the barrel is turned true to the bore and the lathe jaws are cut for that diameter of the stock any out of roundness is due to cutter or tool holder error.

Having expendable and replaceable jaws that are cut for the job on a manual lathe is not often found but is the standard way of running a CNC lathe. As you can see from the holes on the face of jaws this is what these jaws are.

This tool holder looks like a very well thought out method of minimizing those last errors. It is a very nice reamer holder.


Lowell
 
Last edited by a moderator:
Lowell

If you look at the photo Chad posted you'll notice those aren't soft jaws that are bored to size. Their standard hardened jaws. Also, it would take a seperate set-up to true the O.D. of a barrel to the bore and then bore the jaws to the correct size. Waste of time unless your workin off the clock...
 
Here a some photos of a simple reamer pusher I use to ensure my reamer can align itself with the bore....I use an open end wrench held in my hand to keep the reamer from rotating during the reaming process...and feed small .025" then remove and clean reamer...the 1/4 x 28 hex bolt has the head machined square and polished...the shank with the ball end is also polished to allow smooth movement as the reamer is being pushed...

http://i300.photobucket.com/albums/nn1/eww1350/P1010180.jpg
http://i300.photobucket.com/albums/nn1/eww1350/P1010181.jpg
As long as everything is dead center this type will work. If the barrel is running out at all, or if the tailstock is off center, this ball and flat type pusher can cause more problems that it will cure. Just using a dead or live center in the reamers own center would be better than this, IMO.

Trying to hold on to an open-end wrench would not be the safest method to drive the reamer either. Using the pictured method will will work as long as nothing goes amiss but I wouldn't dare try it myself and I have over 45 years machine shop experience.
 
Last edited:
This is just a great thread, and there are lots of minds at work.
I do however know a guy that chambers his own barrels in a 3-jaw.
He has a spyder I made for him, but does not use it. He has dial
indicators, but doesn't use them either. Actually he has no headspace
gauges.He is of course plagued with case problems, but has many
screamer patches and gets some small group money also.
 
The whole point of my post was to show a reamer holder. That's it. After my last post I feel I now have a better understanding now on how a carcass feels when the buzzards begin circling high in the desert sky.

It's an experiment that I'm conducting on myself. The machine is a Daewoo Lynx 200L slant bed turning center with a Fanuc 21i-T control. The chuck is a 3 jaw hydraulic made by Kitigawa. The jaws are the typical hardened jaws found in any machine shop.

The barrel is in fact indicated to a few tenths of runout, although not by a conventional method. It took the better part of an hour to do it. It's a Kreiger. Kreiger historically has been pretty good at holding concentricity between the OD/ID. This barrel was/is no exception. I played with rotating it in the chuck until I got it "good enough". Good enough means below .0002". I then turned, faced, bored, threaded, and chambered.

The muzzle end is hanging out in space with no support. It's quite literally flapping in the breeze. I did this just to see what'd happen. It's my barrel and my gun so I get to do whatever I want in this case. I have a decent inventory of barrels so I can afford to turn one into a tomato stake. It's one of the joys of being self employed and being in control of my own life. In this particular case I kept my spindle RPM on the more conservative side during turning/threading because I wanted to mitigate the thing whipping around like a jump rope.

The chamber runout is less than two tenths. I did goof up with one thing. I used a long probe on my indicator which does reduce the resolution of the indicator. The indicator I used is a B/S that reads in .00005" increments. I used the short probe for set up and the long one after chambering because I wanted to check the length of the chamber. I got .0002" as the highest indicated reading. Since the indicator stylus is about 3 times longer than the short one I'm speculating my chamber runout is probably closer to .0006-.0007.

For as long as I've been in this trade I've chambered barrels using the tried/trued method of supporting both ends in chuck/spider, indicating, and then going for it. I've also stuck it between centers and gone to work with a steady rest. I've made gimbled jaws to allow for barrel flex, I've made rings that go around the barrel to allow for flex, and I've made point contact jaws to allow for flex. I've also used hardened jaws that don't allow for any appreciable flexing. Nay has there ever been one conclusive benefit demonstrated to me other than the more work holding contact I have, the better the surface finishes and the more aggressive I can be with my speeds and feeds.

Let it be known that two weeks ago I dropped $3,000 dollars on a C-16 spindle collet nose and collets from Dunham/Lyndex that can be indicated in just like a four jaw to the nearest gillionth. The benefits here are quick set ups and that I will have more work holding surface contact which I think is quite important. Let it be known that I'm waiting on another $1500 in collets to arrive for the same set up. I've also spent close to 5K on a coolant pump, hydraulic coupler, materials, braided hoses, fittings etc so that I can fully retrofit a $100K turning center (My Doosan) into a barrel eating beast. I have carefully written programs that'll give me receiver/barrel thread fits that I'll put up against anyone anytime, I have drill/ream cycles that make quick work of gutting the ass of a barrel while still holding "benchrest" tolerances.

There's lots of ways to skin cats gents.

Will this gun shoot? I remain optimistic that it will, however it's already been plainly stated to me in so many words that it's probably a lost cause as this barrel is fitted to the action I reworked and displayed in the thread called "Your Method". That generated plenty of negative comments due to my "cavalier" and "hacking" methods. I guess I should just quit now and go plant some tomatoes with this thing.

So oky dokey, I have to get back to ruining my gun now.

Cheers.

Chad
 
reamer holder

This is an interesting and informative post. I know it is routinely done but holding a wrench while a piece is rotating is an accident waiting to happen; your hand being the weakest point.

Lou Baccino
 
Back
Top