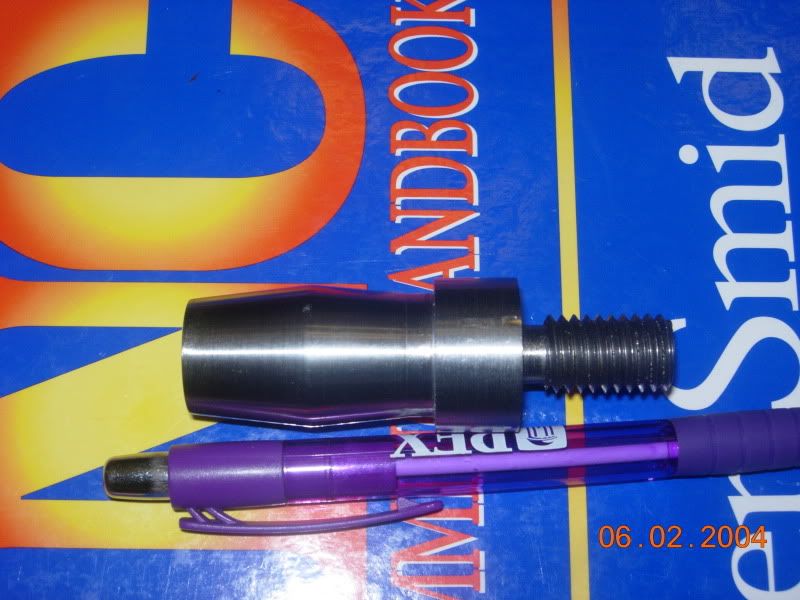
Rem 700 Bolt Fixture

lejarretnoir

JP Poulin
I built myself or should I say copied a design with mandrel and spider. The only problem with getting it right is that the mandrel end needs some kind of way to pivot the bolt otherwise it cannot be made to dial it in right.

Mr. Bryant uses a "threaded ball" type. Can someone explain how I could make that or add something else to my existing mandrel?
Will the live center end bolt spider remain stable after? Seems wobbly during my first attempt at setting up.

img5771.jpg
 
Last edited:
??

Just curious, why not just run the roller rest right on ther bolt. That is what I do. Same set-up, minus the spider.........jackie
 
Last edited:
I use a mandrel as yours and make it sacrificial... It lasts a long time before it is turned too small. Just turn it quite true to the bolt body.
 
Jackie
OK, I understand using the steady rest without spider, but it still is out of round .022. Would that put too much stress on the bolt forcing it in the rest?

Dennis
Sacrificial? I think I know what you mean. Exactly how do I turn it with the bolt body? Trying to envision that.
 
Last edited:
I see

Didn't quite understand your problem.

When you screw the mandrel into the Rem Bolt and tighten it against the face, it will rarley run true. I just do like Dennis, chuck the bolt up true,(a three jaw will be fine) and skin the mandrel true.

If it does not run reasonably true, it will put tyhe set-up in deflection, and as you have noticed, make it difficult to dial the bolt in.

If using a 4-jaw, use some 'soft jaws'. I use a 3-jaw Set-True........jackie
 
I have a Bison and Yuasa set true chucks.

I think I understand. Dial the bolt body in the chuck, put the mandrel in and take a skin cut. Then chuck the mandrel back in.
 
Last edited:
I built myself or should I say copied a design with mandrel and spider. The only problem with getting it right is that the mandrel end needs some kind of way to pivot the bolt otherwise it cannot be made to dial it in right.

Mr. Bryant uses a "threaded ball" type. Can someone explain how I could make that or add something else to my existing mandrel?
Will the live center end bolt spider remain stable after? Seems wobbly during my first attempt at setting up.

I use a very simular set up but use copper shims between the mandrel and jaws. Works like a charn, no chatter, very solid. Look towards the bottom of the page

http://www.louisianaprecisionrifles.com/blueprinting.aspx
 
I built myself or should I say copied a design with mandrel and spider. The only problem with getting it right is that the mandrel end needs some kind of way to pivot the bolt otherwise it cannot be made to dial it in right.

Mr. Bryant uses a "threaded ball" type. Can someone explain how I could make that or add something else to my existing mandrel?
Will the live center end bolt spider remain stable after? Seems wobbly during my first attempt at setting up.


Here is my contribution. Allows for pivot and easy to make.
DSCN5188.jpg
 
Here is what I use........
attachment.php

attachment.php


The ball end is a seating stem from a high pressure valve we use in the gas field that was threaded and the screwed in to the body. It pivots perfectly without stressing the bolt. I use the plug that is fitted tightly to the firing pin hole for roughing cuts for sleeves etc., and then a live center directly in the firing pin hole for final light cuts for the sleeves and truing of lugs. I then attach the collar and make a truing cut to it, and then run it in the steady rest to do the facing operation. I'm an amateur though, may not be the best way but it works.

Hope this helps,
Med.
 

Attachments

  • IMG_2808.jpg
    IMG_2808.jpg
    12.5 KB · Views: 954
  • IMG_2809.jpg
    IMG_2809.jpg
    14.6 KB · Views: 925
I tried using the live center in the firing pin hole, but found that the hole on two bolts were .003 and .004 out of round to the bolt body.
 
once in awhile a bolt is found where the handle is slightly higher
than the body of the bolt. Tightening the mandrill can place
some strain on the handle, so its a good idea to make a small
step on the shoulder of the mandrill, allowing it to tighten on the body
only. Once the mandrill is in place, it can be indicated at the head
and handle end. I make mandrills out of brass and only chuck a short
length, on the skimmed area. This allows some flex. Use a dial indicator
to set your steady rest
 
I tried using the live center in the firing pin hole, but found that the hole on two bolts were .003 and .004 out of round to the bolt body.
But.............Without sleeving and/or bushing the firing pin hole, they will never run true with each other on a factory bolt, it seems like a compromise has to be made if your not sleeving or bushing the firing pin hole, or am I missing something?

Med.
 
Last edited:
Save yourself a whole lot of hassle and stick with what you already have made up for the job. In addition to what you already have, get yourself a strip of copper, something 3 or 4mm thick and cut them into little rectangles in or around the size of the jaws of your chuck. Now use these as your way of pivoting your bolt tool. Never fails to get me setup for that same of yours.
Oh and one other thing, cut that big piece off the back end of your fixture and only use the part in front of your thread.
 
Last edited by a moderator:
I'm not one for making things complicated, but the bolt spider needs to be rethought on how to make that work correctly. Maybe bore it out a bit more then add stop screws to stop the bolt face from advancing further into it. A spider to me only works right when it's bolted, clamped or screwed tight. Just having a live/dead center to line it up isn't enough for my setup. l'll sort that out.

So in order to get this project working for now, I took Jackie and Dennis advise and voila. Turning the mandrel to the bolt body got it so I was able to get within .001 once the steady rest was setup. Try as I may, I cannot get any better with this bolt. From this all my machining can be accomplished. Do I need any further setup?

I also found once the mandrel was true to the bolt body it was also easier to get within .001-2 using the firing pin hole for two bolts. That also can be made to work, but you still need to remove the live center for front facing work.

img5775.jpg


img5776z.jpg
 
You'll find very seldom are Remington bolts completely round. You can't adjust something that is out of round to .0002". Most times if you can get a Remington bolt indicated in to where it's running .001 to .0005" you're doing pretty good. The older the action is and the more it's been shot, the more wear the bolt will have and you just have to do the best job of indicating the bolt in that you can. I'd also suggest running your steady rest as close to the bolt lugs as you can run them as you'll get deflection from the bolt when you make cuts on it.

Also, to help save some grief, don't make a facing cut across the nose of the bolt in front of the extractor. It makes it look pretty, but that's all it does. The lip at the front of the bolt nose is already thin, taking a facing cut across the bolt nose will make it thinner and can result in an extractor pulling out the front of the bolt nose. Let that happen to you once and you won't make that cut anymore. I face the bolt lugs and the bolt face. That's the extent of the truing cuts that I make on the bolt body.
 
Last edited:
Thanks for the tips Mike. I wondered also about cutting the nose. Yep, my intention was to just true the back of the lugs and the face only. The nose doesn't and shouldn't be touching anything. If I need more clearance I'll cut in the barrel recess.

I'm still trying to figure out how you made a threaded ball to pivot the bolt and actually get that bolt spider to remain rock solid in your photos on your site. Not sure if I need to, but am curious since there are others who have used your method and it works.
 
The round knob on the threaded bolt doesn't have to be the greatest as far as round as in a ball. I chucked the 1/2-13 thread in the lathe and cut away most of the material on the other end that wasn't shaped like a ball with a lathe bit and then finished it up with a file spinning in the lathe and then 320 grit sandpaper.

I did just like everyone else when I started, making sacrificial tooling to hold the bolt on the bolt handle end and turning down the end concentric to the bolt body. I just got tired of doing it over and over again, so went to the ball end mandrel. I'm still using the original one that I made years ago. It's a little scarred up from the chuck, but still works well. The 4 set screw fixture on the other end of the bolt is a little flimsy, but works well as long as you make very light cuts and are careful. Before I use it, I'll set the bolt up with a center in the firing pin. If the bolt runout is much over .001" then I'll use the 4 set screw fixture. If it's not, I'll just run the center in the firing pin hole with light pressure.
 
Back
Top