Reaming Die Blanks

Jerry and Al,

Okay...if I'm understanding your reamer pushers correctly, you're pushing a flat surface with a flat surface. Whereas with my Bald Eagle, I'm pushing a flat surface with a rounded (convex) surface. Correct?

So, with the flat on flat pusher, any angular mis-alignment causes the "pushed" surface (back of the reamer/reamer holder) to lose full contact with the "pusher" surface, but counteracts this mis-alignment, resulting in the "high side" push as alluded to by Al. Yes?

Justin

IMO, generally on most lathes the spindle axis and the tailstock axis are parallel but not co-axial, if that sense. So, if the reamer is pushed in its center hole by a center in the tailstock and they are not coaxial, the reamers center is pushed off sideways by the taillstocks center. Whereas if the reamer is pushed by a force that is parallel but not coaxial it still moves along the axis that is should if you can visualize what I am trying to describe.
 
IMO, generally on most lathes the spindle axis and the tailstock axis are parallel but not co-axial, if that sense. So, if the reamer is pushed in its center hole by a center in the tailstock and they are not coaxial, the reamers center is pushed off sideways by the taillstocks center. Whereas if the reamer is pushed by a force that is parallel but not coaxial it still moves along the axis that is should if you can visualize what I am trying to describe.

Jerry,

In re: the above, hence the reason for we all have floating reamer holders of some sort. I follow you on that. Are you saying that the Bald Eagle acts similarly to the above due to the concentrated force of the reaming operation on its point (the small contact surface due to the sperical shaped pusher)?

And does the floater you use work as I described in my previous post?

Thanks,
Justin

Justin, think about the geometry of a small engine lathe. When you buy one the first chore is to level it according to conventional wisdom. It doesn't have to be level!! That lathe can be high or low at the headstock and still function properly. It can be tilted forward or backward and still do you a good job. What it CAN NOT tolerate is twist in the bedways. If you have twist in the bedways, the tailstock whether it is pushing a reamer or providing support via a center in a shaft or barrel that is set up between centers you will get weird results. And, getting the twist out is easy, just set your precision level crossways on the bedways at the headstock and again at the outboard end of the bedways. If those both read the same you are good to go.

Now, take that visualization above and apply it to pushing the reamer. A chambering reamer can cut sideways about as easy as it can cut along its desired axis of travel. So, if the bedways are in a twist or the tailstock is not aligned PARALLEL to the spindle the reamer is somewhat pushed off its desired axis and cuts a chamber larger than desired.

Other detractors, on a new lathe most are assembled so the tailstock is a slight bit higher than the headstock to allow for future wear. Older lathes sometimes have the tailstock base worn to where the tailstock axis is below the headstocks rotational axis. In either of these situations the chamber reamer will be drawn off the rotational axis of the headstock causing an oversize chamber. Additionally, if the tailstock is swiveled off to the left or right its extensional axis will be pointed off to where it forces the reamer off-line.

This is a bit wordy but hopefully it will clarify why you need a method to push the reamer that allows the reamer to follow its true course thus a floating pusher!!
 
Last edited:
Justin, think about the geometry of a small engine lathe. When you buy one the first chore is to level it according to conventional wisdom. It doesn't have to be level!! That lathe can be high or low at the headstock and still function properly. It can be tilted forward or backward and still do you a good job. What it CAN NOT tolerate is twist in the bedways. If you have twist in the bedways, the tailstock whether it is pushing a reamer or providing support via a center in a shaft or barrel that is set up between centers you will get weird results. And, getting the twist out is easy, just set your precision level crossways on the bedways at the headstock and again at the outboard end of the bedways. If those both read the same you are good to go.

Now, take that visualization above and apply it to pushing the reamer. A chambering reamer can cut sideways about as easy as it can cut along its desired axis of travel. So, if the bedways are in a twist or the tailstock is not aligned PARALLEL to the spindle the reamer is somewhat pushed off its desired axis and cuts a chamber larger than desired.

Other detractors, on a new lathe most are assembled so the tailstock is a slight bit higher than the headstock to allow for future wear. Older lathes sometimes have the tailstock base worn to where the tailstock axis is below the headstocks rotational axis. In either of these situations the chamber reamer will be drawn off the rotational axis of the headstock causing an oversize chamber. Additionally, if the tailstock is swiveled off to the left or right its extensional axis will be pointed off to where it forces the reamer off-line.

This is a bit wordy but hopefully it will clarify why you need a method to push the reamer that allows the reamer to follow its true course thus a floating pusher!!

Jerry,

I get all that. I understand why we don't want twist in our beds, bed wear, and high/low tailstocks. As I said in a previous post, that is why we use floating reamer holders...and why I have a high-dollar 12" Starret machinist level.

My questions are about the floating reamer holders themselves. I understand how your pusher reamer holder deals with co-axial mis-alignment. But I'm not quite sure on how it deals with angular mis-alignment. I THINK I know...but I've thought I know a lot of things. I do think I follow you on the Bald Eagle's shortcomings, though.

I'm not taking you to task on this...I'm genuinely curious. Always looking for that better mousetrap.

Justin
 
Jerry, I'm wanting a better look at this reamer pusher. It looks to me like your pusher is a small o.d. shaft counter bored .020 over the diameter of the reamer pushing directly against the back of the reamer.
Looks like Bryant's was held in a chuck. Is it that simple?
 
Jerry, I'm wanting a better look at this reamer pusher. It looks to me like your pusher is a small o.d. shaft counter bored .020 over the diameter of the reamer pushing directly against the back of the reamer.
Looks like Bryant's was held in a chuck. Is it that simple?
I use one like this as well, I hold the pusher in a drill chuck. My bore in the pusher I made is about .050" larger than the reamer shank. The pusher I made does not come in contact with reamer, the pusher is made to push only on the reamer holder. Hope this helps you out
 
Looks to me like all one needs is a morse to jacobs arbor that fits the tail stock and grind the end of the jacobs flat and start pushing against the back of the reamer. Why counter bore your reamer pusher?
 
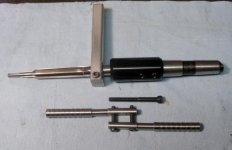
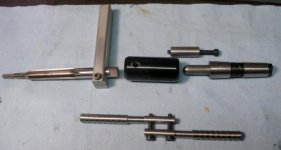
Here is my pusher. It is the bald eagle turned around with a tight fitting bushing made to fit over the end of the morse taper ball end and the fitted to the reamer end of the bald eagle unit. This way I can use it as a bald eagle type pusher or as a Mike Bryant style pusher. The 10/24 bolt thur the bushing is so I can remove the bushing from either part with out any damage.
Chet
pusher 1.jpg

pusher 2.jpg
 
Looks to me like all one needs is a morse to jacobs arbor that fits the tail stock and grind the end of the jacobs flat and start pushing against the back of the reamer. Why counter bore your reamer pusher?

Well I have an answer for this that works for ME, and I've tried both ways. If you push on the back of the reamer you're too close to center, you have no "self centering lever" effect. In fact you can easily push the reamer away from center, make the crookedyness worser......Maybe it'll help you guys to sketch the two (or 3? or 4?) methods to scale and make little arrows to kinda' map the force, that's what I do instead of just driving around with it in my bone. For some reason a sketch helps me visualize it.

al
 
I have been doing some driving and this thread has rattled around in there a little bit.
I think it's worth trying something different when it looks like a change for something better. I might have to try this pusher idea this winter and see how it goes.
Al, I dont see how the reamer can be pushed off center if the reamer is being pushed with a flat surface against the back of the reamer specifically with a pilot fitting the bore and any part of the reamer cutting the new chamber?
It seems to me the only chance of a misalignment would be on a long chambering like a ultra mag where the barrel has been predrilled and bored and the reamer has to be pushed a half inch before the pilot enters the bore. I can understand that it could be critical to not out drill your pilot but if the new chamber is predrilled and bored true and any part of the tapered reamer was in contact with the barrel with the pilot started into the bore how could this flat surface push the reamer off center?

It's not that the flat surface would push anything off center in and of itself but that it doesn't auto-correct as well being too close to center, and that it may actually make a misalignment worse because with the reamer wrapped up (loaded) and trying to chatter anyway having that push-point so close to center does little to resist hopping, or to help stabilize the reamer.


It's kinda like using a little 8" diameter steering wheel on your car VS a nice big one.

Well not really :) but you try it this winter and I think you'll cut some tiny chambers.
 
It seems to me the only chance of a misalignment would be on a long chambering like a ultra mag where the barrel has been predrilled and bored and the reamer has to be pushed a half inch before the pilot enters the bore. I can understand that it could be critical to not out drill your pilot but if the new chamber is predrilled and bored true and any part of the tapered reamer was in contact with the barrel with the pilot started into the bore how could this flat surface push the reamer off center?

I always use a dead center to push the reamer until the pilot engages in the bore. This keeps the reamer steady while it's unsupported and greatly helps to prevent chatter. Once the reamer pilot starts to engage in the bore i switch over to a tube style pusher as described earlier in this thread..

Cheers
leeroy
 
I have been using a reamer holder made by JGS that has served me very well. I like the idea of not holding onto the reamer but I always wonder when is it going to fail? I wonder if sooner or later something will hang up in there and cause a reamer to start crooked.
So far I've produced a lot of match winning barrels with it. I reckon if nothing else I'll learn a different method now as an experiment because I want to instead of learning it under pressure the day I drop my JGS holder and pick it up to see that it no longer floats.
 
Back
Top