Reamer stop collars

Pete Wass

Well-known member
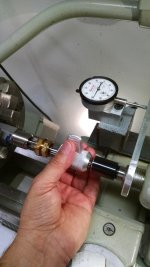
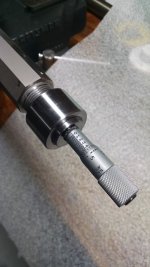
Just curious if anyone besides me uses a stop collar on their reamers? It seemed the logical thing to do, to me so I made one for each of the two reamers I have. Seem to work the very best.

How I arrived at where I set the collar is stuck the reamer in a chamber I wanted to copy, slide the collar on and tighten it with a set screw. So far, both have worked very well.

Pete
 
I use the Lambeth Micrometer Adjustable Reamer stop. Same idea, but is adjustable to .001". I have them on most of my commonly used reamers. I have a couple of spares to swap among the rest.
 
Being but a fly spec in the chambering world it may not mean much, but I use a Lambeth reamer stop and really like it. It great for being able to confidently take .002 for your last cut and know that it is repeatable for the next chamber after you add back .010 given that your tenon lengths are the same.
Mike (aka Steve)
 
Hey Steve

Being but a fly spec in the chambering world it may not mean much, but I use a Lambeth reamer stop and really like it. It great for being able to confidently take .002 for your last cut and know that it is repeatable for the next chamber after you add back .010 given that your tenon lengths are the same.
Mike (aka Steve)

We had our first frost of the year last night. Only three weeks left until Florida!

Pete
 
I Couldn't see

any need to spend money on an expensive micrometer when I knew how deep I wanted my chambers to be. I only do a few barrels for myself, sooooo

Pete
 
I always set mechanical stops short and then figure out a way to use an indicator (often 1/10,000 in.) to make the final bit of the cut.

Fine precision threads and jigs & fixtures work well.
 
Guess I thought it superfluous

I always set mechanical stops short and then figure out a way to use an indicator (often 1/10,000 in.) to make the final bit of the cut.

Fine precision threads and jigs & fixtures work well.


Ill be the first to admit I'm not a machinist or even close to one. Just an old lad fooling about.

Pete
 
I made this adjustable reamer stop for adjusting the engraving length while at the range without taking the gun apart.
reamer stop.JPG
 
I made this adjustable reamer stop for adjusting the engraving length while at the range without taking the gun apart.
View attachment 21693


Jerry, this sure is a beautiful piece of work but being technologically challenged, I don't understand how it works.

You sure have submerged yourself in rimfire in recent years but I'm glad you still communicate with us centerfire guys.
Also glad to know you're staying in close contact with Jerry Stiller. You two together are a force to be reckoned with.

Later,

Gene Beggs
 
The body is .695 diameter to slip inside of the receiver. It is bored to slip over the reamer and held by a set screw. The body is threaded 40tpi with a set of collars to lock the setting. One collar is marked in .001 increments with a .025 scale on the body. I can then adjust it for engraving length I want.
 
That thing was easy. This was much more challenging. The world's first convertible standard/joystick one piece rest. Takes about 5 minutes to convert from one to other and it can set for right or left hand usage as well
joystick.jpg
standard.jpg
 
Like all things BR. Price, outrageous, availability, unobtainium. I built this for my wife as she is a new shooter and has trouble coordinating everything in a timely matter. She has an easier time with the conventional setup but shoots better scores with the joystick configuration. The problem with this rest is there a lot of parts to be made. I have built 5 prototypes so far and the only way to get one is when I build one with some small change in the design. I sold #4(hers-joystick only) at the nationals so I didn't get to test it much and had to build another for her. Someone wanted it really bad even after he just bought a single axis joystick rest.
 
I bought ten 1/2” collars with Allen set screws off ebay for $9. Used a boring bar to fit them to each reamer. I set them close at the beginning, then use feeler gauges after testing the go gauge. Cheap and very effective.
 

Attachments

  • 09DAFFE6-055D-4A8F-90E0-552283E7AE04.jpeg
    09DAFFE6-055D-4A8F-90E0-552283E7AE04.jpeg
    100 KB · Views: 208
Last edited:
What mine looks like

I bought ten 1/2” collars with Allen set screws off ebay for $9. Used a boring bar to fit them to each reamer. I set them close at the beginning, then use feeler gauges after testing the go gauge. Cheap and very effective.

I made me own. Being a hobbyist, I'm always looking for a project and the collars were a project. Likely less expensive to buy some but machining is a hobby and I have plenty of stock. Speaking of stock, I found a scrap yard that sells it aluminum and stainless for a buck a pound. It's close to my Spousal Alternative's home so I go often. I have a quarter mile of aluminum and stainless rounds in stock now :). It's odds and ends but at least the aluminum is marked as to what it is. He gave me a deal on a piece of 7075 the other day because he thought I might have trouble machining it. 3" round that weighs 33 pounds, gave it to me for $30. My Banggood carbide loved it :).

Pete
 
I bought ten 1/2” collars with Allen set screws off ebay for $9. Used a boring bar to fit them to each reamer. I set them close at the beginning, then use feeler gauges after testing the go gauge. Cheap and very effective.

Here's my floating reamer holder/pusher and reamer stop set-up. I made the reamer stop out of some brass tubing fittings. I use the gauge shown to measure the depth of the case rim cut. I purposely set the reamer stop to cut the rim depth shallow, make a measurement, and then turn the reamer stop in to allow the reamer to cut further by the difference.

Reaming a chamber with this set-up is very slow as you can only take light cuts or else the reamer grabs to much and your grip on the serrated piece can only resist so much torque. I dont chamber a lot of barrels so Im not in a hurry. Chambers turn out very tight and three chambers i've cut with this reamer and set-up all accept the same fireformed case.
 

Attachments

  • Chamber Reamer Pusher and Stop.jpg
    Chamber Reamer Pusher and Stop.jpg
    2.9 MB · Views: 348
  • rim cut depth gauge.jpg
    rim cut depth gauge.jpg
    2.7 MB · Views: 308
Very nice work

Here's my floating reamer holder/pusher and reamer stop set-up. I made the reamer stop out of some brass tubing fittings. I use the gauge shown to measure the depth of the case rim cut. I purposely set the reamer stop to cut the rim depth shallow, make a measurement, and then turn the reamer stop in to allow the reamer to cut further by the difference.

Reaming a chamber with this set-up is very slow as you can only take light cuts or else the reamer grabs to much and your grip on the serrated piece can only resist so much torque. I dont chamber a lot of barrels so Im not in a hurry. Chambers turn out very tight and three chambers i've cut with this reamer and set-up all accept the same fireformed case.

I'm too old and use the shop way too little to ever be good enough to make things that look that good. I've never been very good at machining. My hand-eye coordination and just the feel for it hasn't ever been good. I love doing it but, well , lets say i've been better at watching the Youtubes showing how to do it.

Pete
 
Back
Top