Need help with chamber pre-drill and bore.

P

pdhntr

Guest
This is my first attempt at pre-drilling and boring a chamber (before reaming) and I have some questions. I would like to try the "step" boring method rather than trying to duplicate the angle of case, but I will listen and be grateful for any help.

Do you guys drill and bore so that the pilot is supported by the bore from the beginning?

I am doing a 6-06 chamber. So basically the drill and bore would be the same as a 30-06 right?

Can someone please give me some measurements to help me visualize what to do?

For instance: drill with an X drill to such a depth, then bore to .4__? to this depth, then bore to .4___? to this depth.

For some reason I just can't wrap my head around how to do this. I have tried drawing it out on paper and I just don't have the knowledge to know if it is right.

Thanks guys.

Jim
 
Jackie posted pictures of his set up, step by step in chambering a barrel. Do a search and view his pictures to get a better idea of the process.

Hal
 
but that was a 6ppc, and no numbers...
measure the reamer, use the reamer drawing...
but dont use the pilot....kinda silly to spend all the time centering the the bbl at the throat and then let a bushing push it off....
drill, reach in as deep as you can and redail in the the throat.
bore on this new center, them ream.
mike in co
 
Jackie posted pictures of his set up, step by step in chambering a barrel. Do a search and view his pictures to get a better idea of the process.

Hal

Thanks Hal.

I know the thread well. I studied it carefully. I feel I understand the process quite well.

It is looking at the chamber drawings and deciding what drill to use, what to bore to for a certain depth, and so on. I don't believe that information was in Jackie's thread.

In other words, how does a person who is going to drill and bore before reaming decide on the dimensions so your 26 inch barrel doesn't end up at 24?

Jim
 
but that was a 6ppc, and no numbers...
measure the reamer, use the reamer drawing...
but dont use the pilot....kinda silly to spend all the time centering the the bbl at the throat and then let a bushing push it off....
drill, reach in as deep as you can and redail in the the throat.
bore on this new center, them ream.
mike in co

Thanks Mike.

I can measure the reamer, and use the print. No problems there. I understand what has to happen.

I just don't know how deep to drill, how much to bore with any given chamber? (an answer could be it depends on the chamber, but that is my question, how does the chamber "set" your drilling and boring depth and diameter?)

Do you drill to the shoulder line, then bore to the shoulder diameter where it will be in the chamber, or "hold it back" some distance, etc.

If you could give me an example of what drill and boring depths you would use for a certain chamber then I could understand what I should do for this one.

Jim
 
Last edited by a moderator:
look at the print..there is a reference line a .200 from the bolt face, and lots lengths from there with dia....drill less than the dia, less than the length(adjust for bolt face .200 number)
 
look at the print..there is a reference line a .200 from the bolt face, and lots lengths from there with dia....drill less than the dia, less than the length(adjust for bolt face .200 number)

Thank you Mike.

Jim
 
I just don't know how deep to drill, how much to bore with any given chamber? (an answer could be it depends on the chamber, but that is my question, how does the chamber "set" your drilling and boring depth and diameter?)
I drill to just up short of the shoulder, and I make sure the drill edges are my point of reference, since the drill is far steeper than the shoulder. As to boring, don't bother with the steps, just set up the compound to the proper angle and bore. Life is much simpler then.

Do you drill to the shoulder line, then bore to the shoulder diameter where it will be in the chamber, or "hold it back" some distance, etc.
Hold back some, or your drill / boring bar, would be leaving marks in the finished chamber. .025 on the diameter and .040 on the depth should be easy enough to do. Do not forget to avoid the radii. The shoulder / body junction will have one and it will interfere with your drill depth if you're not careful.

If you could give me an example of what drill and boring depths you would use for a certain chamber then I could understand what I should do for this one.

Jim
If I was you, I'd draw it in a cad program and do the dimensioning yourself. Google up Draftsight (free cad) and use that if you don't have some other pay version available. It works a lot like Autocad did back in the R14 days. Opens and saves the files too.
 
Thanks 4Mesh.

That is very good information. I wanted some actual measurements that you guys use, and you provided that.

I will check out Draftsight.

Thanks again.

Jim
 
What I do is measure the length of the go gage from the base to the shoulder if it's a rimless case, subtract .100" off of that and drill to that depth at the major diameter of the front of the drill bit. Then set up the boring bar to bore to a depth .050" shorter than the drilled depth. This is for a Remington or coned bolt setup. You would need to lessen this length if chambering a barrel for an action that has a flat bolt nose. I'll measure the diameter of the reamer at the shoulder and bore to a diameter that is .010" to .015" smaller in diameter than what the reamer measures with a dial caliper at the shoulder. Where the reamer starts in the bored hole, I'll bore it to where the reamer shoulder just starts at full diameter in the bored hole for about .050". I'll push with a dead center on the lathe that I have currently and then switch over to a floater when I get almost to full depth on the chamber, the last .100 or .200 of the chamber. My bored hole is a straight hole and not tapered. That's roughly how I do it. As long as you get a concentric chamber in line with the bore when you are done, that's all that matters.

By the way, I've been using the Grizzly rods to check for run out at the start of the barrel and at the projected throat and beyond. The most run out at the breech end that I've seen after indicating the bore at the projected throat has been .002". That's one of the reasons to drill and bore out most of the chamber. It helps on run out at the breech end. However, the only part that seems to matter on run out as to whether the barrel will shoot or not is the run out at the throat. If the chamber isn't in the center at that point when you're done, the barrel will not shoot to it's potential. As to using a Grizzly rod or using a long indicator point to reach the projected throat, it doesn't seem to matter. I've indicated in with the Grizzly rod and then checked with the long indicator point and indicated in with the long indicator point and then checked with the Grizzly rod. It indicates in at that point about the same with no particular preference as to one being better than the other. I'm not going to move the muzzle end around to remove .002" of run out at the breech end.
 
Simple answer for any cartridge. Measure the cartridge or the reamer at the body/shoulder intersection. Pick a drill bit that is 0.015" - 0.025" smaller in diameter than the shoulder dimension determined above. With a marker pin make a mark on the drill body that is 0.050 or so shorter than the finished shoulder depth (or if you have an existing barrel with that chamber, just run the drill into the old barrel, pull it back about 1/16" or so and make the mark there,

Then take a couple of boring cuts 1/2" or so deep of about 0.005". This will true up the chamber base to control the reamer body., the reamer bushing will control the front of the reamer.

As to making straight cuts or a taper equal to the cartridge body, it makes no difference since either will guide the reamer body.
 
Got it figured out.

Thanks Mike and Jerry.

I got it figured out last night and tonight I drilled and bored. Tomorrow I will chamber.

I did a test run on a piece of aluminum rod and then chambered it. Everything went well. The confidence of a test run really helped.

I drilled 1.800 with a 3/8 drill, then taper bored with the case head measurement of .460. The pilot fits in the bore and the body is just ready to touch.

I first lined up the throat and the breech and found the muzzle was out (way) more than I expected. So I got the muzzle and the throat running dead nuts and drilled, checked and then bored.

I never could have done that without all of your help.

Thanks so much.

Jim
 
By the way, I've been using the Grizzly rods to check for run out at the start of the barrel and at the projected throat and beyond. The most run out at the breech end that I've seen after indicating the bore at the projected throat has been .002". That's one of the reasons to drill and bore out most of the chamber. It helps on run out at the breech end. However, the only part that seems to matter on run out as to whether the barrel will shoot or not is the run out at the throat. If the chamber isn't in the center at that point when you're done, the barrel will not shoot to it's potential. As to using a Grizzly rod or using a long indicator point to reach the projected throat, it doesn't seem to matter. I've indicated in with the Grizzly rod and then checked with the long indicator point and indicated in with the long indicator point and then checked with the Grizzly rod. It indicates in at that point about the same with no particular preference as to one being better than the other. I'm not going to move the muzzle end around to remove .002" of run out at the breech end.

BRAVO MIKE!!!!

I'm glad to see you trying it..... and about that .002 runout you've found, regardless how you decide to deal with it, YOU FOUND IT! And it wasn't "fake," nor was it an abberation due to "improper setup" or any other blah blahh....two thou in 2-3 inches??? Regardless what you do with the muzzle you FOUND the runout, repeatably.

thank you

al
 
Chambered tonight.

Checked my work as best as I know how afterwards (per Jerry's repeated urgings, LOL).

The results were way beyond my expectations for my first chamber on my lathe.

Thanks to all again.

Jim
 
When I bought my first lathe in the '80's, I chambered my first barrel and I managed to get the threads a little looser than I wanted and wasn't satisfied with the fit of the threads. I took it to the range and shot a zero with it at 100 yards. One of the stupidest things I did was take it home and cut the threads off and cut new threads and rechamber just so I could cut the threads tighter. It shot alright afterward, but never as good as it did with the first chamber. Now days I know better, if the barrel shoots, leave it alone, if it doesn't, that's when you work on it some more or discard it and go to another barrel.
 
Back before I had my own lathe I hung around a shop one weekend while a feller fit some barrels for me. He showed me how to set the threads up so there is a little play, just enough to pick up the back of the action a little.
Several years later when I started fitting my own barrels I didn't want to risk galling my threads and I remembered what that gunsmith had showed me so I left them a little loose, it don't hurt a thing.
 
Years ago I was talking with Harold Broughton about thread fit. He said the difference between a tight thread and a loose thread is that the loose thread had more clearance. When the thread tightens up, it will always have clearance between the rear flank of the barrel thread and the front flank of the receiver thread. A tight thread will have less clearance there, a loose thread will have more clearance. He made the statement "clearance is clearance." Now days if the receiver screws onto the barrel with no shake on the barrel tenon, I'll go in with the compound another thousandth and give the thread a little more clearance. I want the action to be able to shoulder up fully on the barrel shoulder. If it doesn't have enough thread clearance, it may not shoulder up all the way around the tenon.
 
step boring

IMG_20110808_202808.jpg

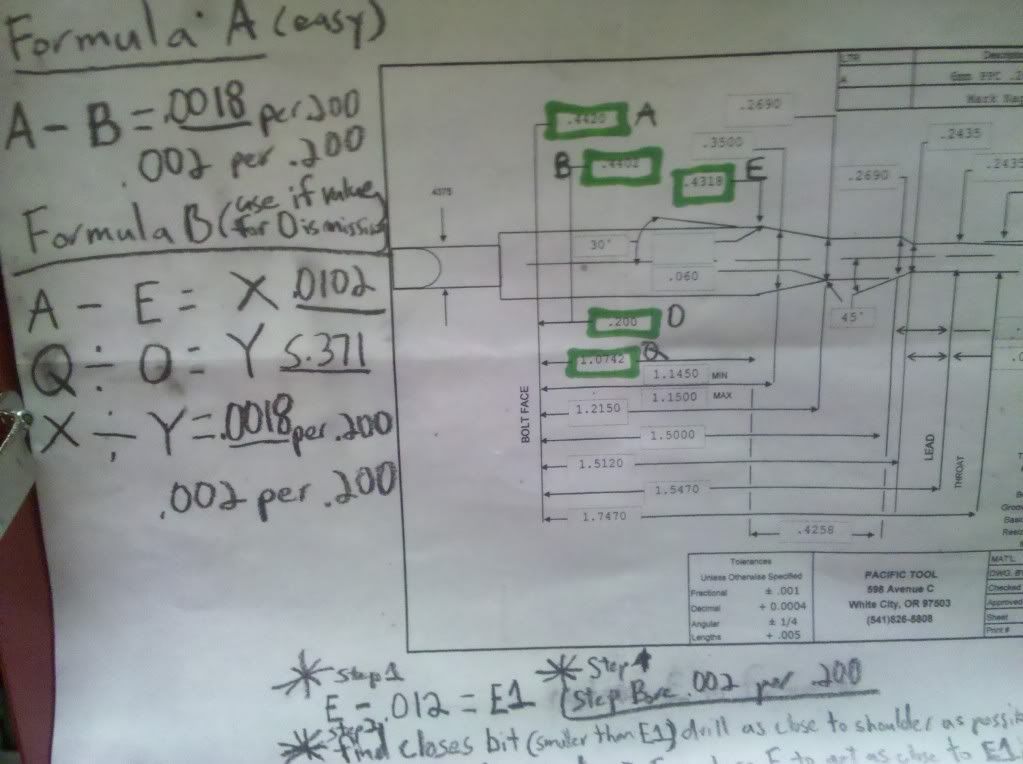
Here's a couple of formulas for step boring, A and B are most reamer prints and I came up with a formula for the prints that don't have values for A and B. First time doing it you may want to go .20 or so undersize and bore a bit short of the shoulder.
JCK
 
Back
Top