My new lathe - Precision Matthews PM1340

When I took the NRA courses in Troy, I stayed at the Eagle Spring Inn. Great folks and excellent food, but a bit far away from the school. And I was the only one out there from the school. Most folks stayed at the motel right outside the school.

Those NRA courses can not be beat. I went three years in a row..........
 
If you guys don't mind, i can add how i handled my lathe. Mine was delivered by an 18 wheeler, suppose to have been a lift gate. The driver said he could bring it back in a few days in a lift gate but it was going to be an additional cost.

Me i have been waiting for about 15 years on a nice lathe, no way he was leaving with it, lol. I had 2 nice 10' slick planks, backed up my pick-up, planked into the back of the 18 wheeler, the driver used his palate jack to get the crate about 1/3 way on the 2 boards. I poured a little oil on the boards and the crate slid right into the back of my pickup, off the road and into the driveway and under an a-frame i had. Removed the crate and hoisted the lathe -set it on the back of a garden wagon i had.

Sorry, for this interuption raining outside and scanning thru a forum that I very seldon open. The way joe described the above scerero I was laughing hard and remembering the many times this has happened to us all. We get all excited about something and then it happens, a setback, but we're determined not to let it stop us from this dream. (joe) said he wasn't letting that thing leave! He put those boards down and poured the old 30W to them and slide it off. I could only think what was going thru that truckers mind. Reminds me of my days as a kid when Mom (Turned 80 this week) wanted to clean behind an appliance (usually Refrig) that was too heavy for her to move byherself. She cut the skin off a ham. We had linoleum on our kitchen floor. After placing 1 of these pig skins under each leg she could move it anywhere by herself. You guys are living a dream, what man hasn't looked at a lathe and thought about what he could do it he only had one! Good Luck, Sorry for the interruption!
 
Ultramagmed,

Thanks for the tips on the HSS bits. Couple of questions:

1) Do you buy pre-cut HSS bits as the starting point then re-grind them when they get dull, or do you buy complete blanks?
2) Are you using a standard bench grinder to do your HSS lathe tool grinding? I have an 8' slow speed bench grinder, that I believe if I put a better tool rest on it, would work pretty well... Your thoughts?

Once again, thank you all for your comments so far!

Scott...

Scott,

Sorry it took me so long to get back to you.

1) I have bought pre-cut tools but, I am now buying blanks and grinding them myself.

2) I bought a tool grinder from Harbor Freight, I think a bench grinder would work also. Here is a picture below.

Twisted,

I bought a Grizzly G4003G and have no complaints so far but, I have never ran "High Dollar" equipment before either, I don't have anything to reference to. It does everything I want it do, and I would recommend one to anyone!! I am working on my second gun as we speak, and have only been running a lathe since I got it running in October.

Here are some pictures of some of the things I have been working on lately.
 

Attachments

  • IMG_2632.jpg
    IMG_2632.jpg
    28.5 KB · Views: 685
  • IMG_2633.jpg
    IMG_2633.jpg
    31.8 KB · Views: 1,313
  • IMG_2634.jpg
    IMG_2634.jpg
    26.4 KB · Views: 644
  • IMG_2635.jpg
    IMG_2635.jpg
    25.2 KB · Views: 649
  • IMG_2636.jpg
    IMG_2636.jpg
    18.8 KB · Views: 631
Last edited:
Some more........

Pictures
 

Attachments

  • IMG_2637.jpg
    IMG_2637.jpg
    22.7 KB · Views: 493
  • IMG_2638.jpg
    IMG_2638.jpg
    19.6 KB · Views: 445
  • IMG_2639.jpg
    IMG_2639.jpg
    21.8 KB · Views: 443
  • IMG_2640.jpg
    IMG_2640.jpg
    22.7 KB · Views: 459
  • IMG_2641.jpg
    IMG_2641.jpg
    20.1 KB · Views: 503
Scott,

Sorry it took me so long to get back to you.

1) I have bought pre-cut tools but, I am now buying blanks and grinding them myself.

2) I bought a tool grinder from Harbor Freight, I think a bench grinder would work also. Here is a picture below.

Twisted,

I bought a Grizzly G4003G and have no complaints so far but, I have never ran "High Dollar" equipment before either, I don't have anything to reference to. It does everything I want it do, and I would recommend one to anyone!! I am working on my second gun as we speak, and have only been running a lathe since I got it running in October.

Here are some pictures of some of the things I have been working on lately.

Need to move the action jig futher into the chuck to improve support and minimize runnout of bearing imperfections...................Don


attachment.php
 
Don......

How close do I need to get rear bolts to the chuck jaws? I suppose, just enough to get a wrench on them would work. I have about an inch I can take off. Thanks for the advice.

Med.
 
Steady

OR you could position a steady rest about midway on your truing jig to help steady the set-up. Also when chasing threads don't forget to apply a little hand pressure to the carriage wheel so that it doesn't fall over the top.:)
 
How close do I need to get rear bolts to the chuck jaws? I suppose, just enough to get a wrench on them would work. I have about an inch I can take off. Thanks for the advice.

Med.


You want as little of the jig hanging out from the 4 jaw chuck jaws as possible, which means I would move the rear bolts, closest to the chuck jaws, as far forward as possible, relative to the longest loading port action that you plan to use the jig on, then cut the excess jig tube back to within .250-.375 of the rear adjuster bolts. I like my adjuster bolts to contact just forward and aft of the longest loading port area of an action that I will be truing. All the action machining is going to be done at the front end, so why not support that area the most.

The rear adjuster bolts should be clocked to fit in between the 4 jaw chuck jaws, evenly spaced, putting them almost within contact of the chuck face, but with enough room to adjust with a socket head.

This all assumes that your action diameters are 1.5" or less and will fit inside the i.d. of your 4 jaw chuck thru hole.

Ballpark, it looks like you could shorten the thing and move it rearward 3-4 inches.

As stated in a previous post, you can support the longer jig with a steady rest, but it takes more time to setup and breakdown, but will definitely provide the needed support............. if you go this route, make sure the jig is fully dialed in to the 4 jaw before applying the steadyrest, or you could create a wobble that could lead to "busted drive shaft" effect.

Note; below how well supported Mike Bryants jig fixture is, and with very little overhang from the chuck jaws, this is what you want to shoot for...........................Don


true4.jpg
 
Last edited:
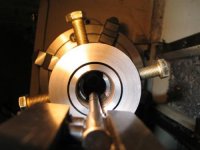
I don't see why the action truing fixture in ultramagmed's pictures won't work. It looks to me to be a home made copy of the Gre-Tan jig. It could be shortened a bit (1/2" maybe). More important it could be made considerably safer to work around if brass tipped set screws were used in place of the big meat hook bolts, but other than that, it looks just fine to me.

The bolt sets on Mike Bryant's fixture look to me to be too close together to get the ejection port for even my short action between them. I measure a minimum bolt spacing for my .243 of 3-3/4" to clear the ejection port - Mike's whole jig isn't much more than 4" long, it that. I suspect Mike Bryant's jig has a collet around the receiver inside it. The one Ed Franklin uses is short like that and has a relatively thin aluminum split collet around the receiver. The clamp screws are basically "snug", not "tight", but "snug" works well enough with the very light forces involved.

I don't have a problem with Mike's jig either. It will work just fine.

The Gre-Tan jig, that I've seen advertised on his web-site, is quite a bit longer that Mike Bryant's and looks like it has room for the ejection port of a long action between the bolts.

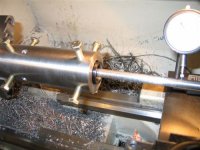
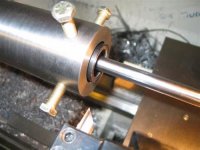
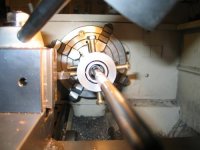
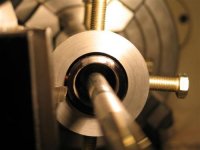
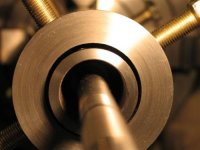
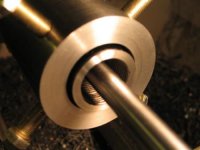
I believe either jig can work, and in fact I made one of each design on the basis that there could be a situation in which one would work better than the other. They are the two jigs in this picture:

ReceiverSleeves-3.jpg


The shorter one, is to be used with an aluminum or brass split collet around the receiver (round receivers only) and is made to the dimensions I got from Ed Franklin when I e-mailed him after buying and watching (several times) his video. The other, which looks like the one every one says is too long, is just long enough to have a bolt in front of and behind the ejection port on my .223, .243, and .30-06 (both long and short actions). I've had it in the lathe and it works just fine. I haven't used the shorter one yet.

I agree shorter is better in theory. But in practice, unless the head stock bearings are too loose to be acceptable for chambering, in which case they should be fixed as the next order of business, it probably doesn't make a difference for jigs like the one in the picture, or my long jig.

Why do I think that? That's a reasonable question, and I'll answer it.

First:

One assumes the headstock bearings are good enough for chambering and the 4J is securely attached to the spindle. If either of these isn't true, the discussion is moot because the lathe is unuseable and needs fixing.

Second:

Once the jig is centered and securely clamped in the 4J, given the light cuts (and resultant very light forces) associated with truing a receiver and machining the locking lugs, it isn't going anywhere and the forces won't cause enough deflection to have any measurable effect on the quality of the work.

Third:

The receiver is aligned in the jig "after" it is centered in the chuck, which makes receiver alignment independent of jig alignment, and the jig isn't removed until after the machining is done. That makes Jig alignment and receiver alignment completely independent within reasonable limits.

To summarize - the forces are light, the jig is stiff enough to have acceptable deflection with the light forces, the jig and receiver are installed and aligned sequentially so their alignment is independent. That being the case I don't really see a problem with the setup in ultramagmed's pictures.

As mentioned in my first paragraph, guy could take a bit off the back end of the jig in the pictures, and swap the meat hook bolts (safety issue) for relatively short brass tipped set screws (like Mike Bryant uses), but other than that it should work just fine.

YMMV. As usual, I don't have any indispensible ego attached to this, it's just simple physics, if I'm missing something I'll learn from having it pointed out, so have at it.

Fitch
 
Just thought I would add a post letting everyone know the thread is still alive. I have about 4 projects going on right now, and this lathe is one of them.

I have still not received my parts to fix the damage in shipment, but Matt assures me they are working on it. I'll keep you all up to date on the progress.

I did have an interesting thing happen over the weekend. I was using a parting tool to cut off a lead screw for a CNC machine... It was working fine, but out of the blue the stock crept up on the parting tool and before I knew it bent the parting tool, and moved my QTCP. Scary when it happened! So, I'm now interested in where other people place the parting tool. Do you center it in the middle of the stock (up and down), or below center?

Scott...


Centered middle of stock, heavy positive rake, very-very slow auto feed, constant lubricant..............and most important of all, as little tool overhange as possible to complete the cut..................Don
 
I don't know if this is the right term but perfectly perpendicular to the work will also help out alot.
My first parting tool episode was definately a learning experience.
The combined problem of too much tool out of the holder and a bit of an angle led to a snapped parting tool. The work was damaged also.
Fortunately the majority of the damage was confined to my pride.
 
Thanks..........

Thanks for the feedback Fitch and Don, I may modify my jig a little. I think it worked just fine but, I agree it could be shortened up a little and the "Meat Hooks" could use some attention. At any rate here are some pictures of the finished product, I think it turned out alright, but the proof is on the paper. I'll post some targets when I get them shot. It's a 6.5-06, .292 nk, .160 free bore, as posted previously I trued the lug abutments, single point re-cut the threads, squared the receiver face, squared the bolt face, trued the bolt lugs, and sleeved the bolt. The stock is pillar bedded with Devcon. It has a Shilen #5 contour 1:8 twist stainless barrel with a Harrell's Precision brake. Not a benchrest rifle, but should be a great hunting/target rifle (considering no dust gets on the sleeved bolt). None the less it was a fun learning project for some one who has only been operating a lathe since October of last year.

Thanks again to all,
Med.
 

Attachments

  • IMG_2660.jpg
    IMG_2660.jpg
    20.6 KB · Views: 487
  • IMG_2661.jpg
    IMG_2661.jpg
    23.1 KB · Views: 456
  • IMG_2662.jpg
    IMG_2662.jpg
    18 KB · Views: 460
  • IMG_2663.jpg
    IMG_2663.jpg
    20.5 KB · Views: 478
Last edited:
In my 11 years of owning my PM1236, I have barrelled a few dozen actions, but that is tiny fraction of my using it every day.

Lots to say good about it, but here are some complaints:
1) The 5 Volt power supply in the DRO died.
2) A gear came loose in the lower gear box.
3) I broke the crossfeed scale for the DRO. For the replacement I drilled and tapped to mount it further back.
4) I replaced the 24VAC light with many systems until I found one reliable.
5) The 16TPI Remington threads take a different gear than the 12TPI Mauser and 3 gears to change for whatever metric Arisakas and Howas take.
6) I wore out some lead screw driving gear from adjusting the banjo wrongly.

This is the lamp that works with 24VAC and holds up:
https://smile.amazon.com/gp/product/B06XTQ7T4H/ref=ppx_yo_dt_b_search_asin_title?ie=UTF8&psc=1


Applied Science reviewed his Grizzly gunsmithing lathe 8 years ago.
He makes videos on dozens of topics, but of those, the few I know about, like magnetic flux density and op amps, he seems to learn things much faster than me.
https://www.youtube.com/watch?v=5YA2g9CGstg
 

Attachments

  • 24VAC LED flood light 20200204_082304.jpg
    24VAC LED flood light 20200204_082304.jpg
    179.1 KB · Views: 103
PM 1340GT After a years use

After using our 1340GT Precision Mathews for a little over year now (took delivery of it new 01/2019) I have been nothing but pleased with how it has performed. After initial setup, I checked the run out at the spindle nose and subsequently after every oil change and see less than 0.0001" of runout each time. The lathe took a little getting used to for me since everything was a bit on the tight side when new as compared to the old used up Barcorp 1430 that I taught myself on, but in the year of use things have freed up and I know its individual nuance's now like any lathe will have. My main issue was in the engagement of the half nut not being as "wore in" smooth as I was used to on the Barcorp but after a little time, that was remedied. I have had issues with the light that is included with the unit as well that includes being shipped a second unit from Precision Mathews but that unit also failed in short order. My rigging of a fix was to just wire it straight to the led bulb unit and bypass all of the small electrical boards in the light housing and use an old battery charger that was 24v output and plug it into the wall outlet near the machine. Works like a champ. I setup through the headstock of the lathe when doing barrel work and have yet to come up with a way that I am 100% satisfied with to hold my outboard indicator, but have had fine luck just sticking the mag base to the side of the electrical box (gear/belt cover is cast aluminum) and arming the indicator over and into to the barrel. I could attach a permanent base to the cover but I have to remove the upper hand nut while using my spider to clearance the adjustment screws and don't trust the cover not to move and cause false readings on the indicator. The 3 jaw provided with the lathe works well when I am doing that type work but is still a shade tight on the adjustment screws moving the jaws in and out. I do wish that the angle scale for the compound provided further increments than 0-60 degrees but when I am that worried about the angle I just do the math and set it up where it needs to be off the indicators.

Overall I am very proud of the purchase of the 1340GT and would do it over again in a heartbeat. While I have not used the grizzly machines to make a fair comparison, I would strongly recommend the precision Mathews brand. Excellent customer service throughout the purchase/shipping and while I was fighting that silly light. Others that I have talked to that use the similar models to the 1340GT have told me very similar stories of their experiences with Precision Mathews equipment and also recommend them.

Tad
 
Back
Top