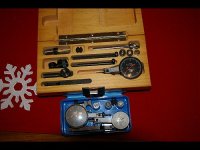
Test Indicators

adamsgt

Jerry Adams
I picked up a collection of Brown & Sharpe test indicators from a retired machinist at a gun show recently. A couple of questions come to mind. One of the indicators shows a resolution of .00005. Does this mean 5 hundred thousandths for each division? Second, up til now I have only used dial indicators for measuring and it finally dawned on me that I have no idea how to use all those accessories that come with the test indicators, especially the rectangular arms. :confused: I don't seem to have any kind of base that would take them. Anyone know where I might find some instructional material on what type of bases I need to set up these indicators?
 

Attachments

  • test ind2.jpg
    test ind2.jpg
    28.6 KB · Views: 315
The .00005 indicator is refered to as 50 millionths. Or easier as half a tenth.

The rectangular bars are made to use with a Height Gage. Don
 
Starrett has some info out on the web about how to use those 'accessories' - If you have the set I think you have, then the various bars are used debending on what holder you put them in (for example, one should fit the toolholder on your lathe) - then you have the various swivels and such to articulate the assembly to get the measuring needle/pin where you want it on whatever you are measuring. I suppose this is all hard to explain in words.... I'd hit starrets website first, and if you get stuck I'll take some digital pics of my manual for you.
 
The height gage bar Don refers to above would go in a gage like shown below among other uses;

http://cgi.ebay.com/300mm-x-0-02mm-...ageNameZWD1VQQcmdZViewItem?_trksid=p1638.m118

Scroll down the page on this eBay ad and notice the offset bar at the end of the vernier arm. Your rectangular bar would instead be clamped in that location instead of the offset bar. Then you would use this assembly, with your dial indicator attached, and a granite surface plate to measure heights or transfer measurements.

BTW, this is a great price on a vernier height gage.
 
Back
Top